Stitching the bag.
The finished bag with asymmetrical closure.
The backside of the bag.
Ready for gifting.
Since this piece was essentially flat felt with a little stitching...
...it was an incredibly easy project to make.
Once in awhile, I think it's nice to stray from my (beloved) resist projects...
...and to use felt, instead, as fabric yardage!
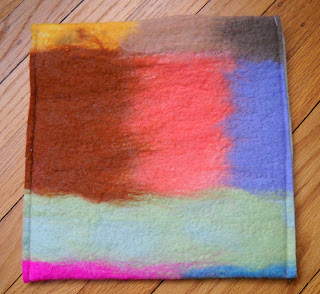
The merino top made a felt piece that was thin and pliable...
...and it stitched like a dream.
I made a covered button with a bit of leftover felt...
...and decided on an off-center closure for interest.
Unfortunately, the friend for whom I made this gift (Mary)...
...has been quite ill with heart irregularities the last month or so.
Mary lost a sister in mid-life to a sudden onset heart attack...
...and I know that she is both frightened, and chafing at her relative immobility.
(She is generally an extremely active and vibrant woman!!)
I wonder if I might ask you to keep her in your thoughts and/or prayers...
...as her doctor sorts out additional testing and medication to treat her condition?
Thank you, dear friends!
The function of the artist is to express reality as felt. Robert Motherwell
Sunday, January 30, 2011
Friday, January 28, 2011
Wet-Felted E-Reader Bag
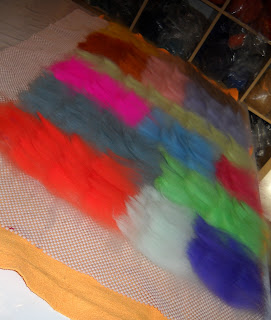
The layout.
Merino roving in lots of colors.
The finished, dried felt.
Trimming to size.
I know that you think you're safe from my Christmas projects, now that I'm done with the pillows...
...but I still have a few projects to show you that I made for gifts last year. Grin.
I had been on the fence about what to make for a sweet co-worker of mine...
...when she received an e-reader for a birthday gift.
"How perfect!", I thought...
...I'll make it a colorful outfit! :)
Since I wasn't sure about the measurements, I checked out some covers online...
...and one day, even surreptitiously measured hers while whe was out of the office.
I decided to make it a big larger than needed...
...in case she wanted to store the charger and cords with it.
Since she is a colorful girl...
...I made a large, flat piece of felt using merino top in lots of different colors.
I tiled the color sections...
...to give it a sort of watery look.
Next time...
...the finished bag.
Thursday, January 27, 2011
Pickled Red Beet (Beetroot) Eggs
Starting with canned, sliced beets saves time.
Chopped onions, peeled, hard-boiled eggs, and sliced beets.
Glistening and rosy hued.
The colorful and delicious result.
I saw a recipe for pickled eggs (using pickling spices) online the other day...
...and remembered my grandmother's delicious pickled red beet eggs.
This is not a recipe that I often prepare...
...and since my original recipe card went missing some time ago, I found a similar recipe on the internet.
These are truly startling-looking when cut open...
...and they have a satisfyingly sweet and sour taste.
It's a good recipe to keep on hand for just after Easter...
...when you might have a glut of hard-cooked eggs and no idea what to do with them!
Ingredients
1 (15 ounce) can of sliced beets
1 onion, thinly sliced
12 hard cooked eggs with the shells removed and left whole
1/4 cup white sugar
1/2 cup vinegar
Directions
Drain liquid from the beets into a saucepan.
Place beets, onions, and eggs into a large bowl or lidded jar.
Pour sugar and vinegar into the saucepan with the beet liquid and bring the mixture to a boil.
Reduce the heat to low, and let the mixture simmer for 15 minutes.
Pour the beet juice mixture over the beets, eggs, and onions.
Seal the bowl or jar and refrigerate for at least one to three days,
stirring or shaking occasionally.
The longer they are allowed to sit, the better they will taste.
Wednesday, January 26, 2011
70's 'Lurve'- Native Funk and Flash
The book cover...featuring Alexandra's hand-embroidered jeans.
I just love these guys!!
Painstakingly stitched.
What a great look...and bag!
I'd been looking for a copy of this seminal book for several years, now...
...so imagine my excitement when I read a letter in Fiberarts magazine from the author, herself!
And while there's no felting at all in this book...
...it is filled with iconic images of a very particular generation of wearable art.
Alexandra Jacopetti (now Hart) is still very much alive and well and living in CA...
...and, unsurprisingly, has recently begun an Elder's Salon where folks from
their 40's to 80's can meet to talk about life, philosophy and societal change.
Being a '70's girl', myself, I love the 'trip back in time' that this book provides...
...reminding me of the days when the world seemed more naive and hopeful, humor was less mean, and young people weren't as cynical.
If you'd love to see more (and own a copy of this amazing time capsule, yourself)...
...you are welcome to contact Alexandra at ahart(at)sonic(dot)net.
She has a few boxes of brand-new copies of this book that were hidden away in an attic all of these years...
...and she'll even autograph one for you, if you like!!
Monday, January 24, 2011
Orange and Raw Locks Purse- Part 2
Pebbled purse front.
With the flap open (now you see why I made a 'beard' of raw locks).
Purse back.
Close up of raw locks puddle.
Like everything else, working with raw locks has a learning curve...
...and with each 'fleece-in-the-grease' project, I figure out something new.
I found that it can be helpful to have a small bowl of concentrated soap
solution on hand...
...in which to dip the cut ends of the locks before attaching them to the
roving surface.
As with some of my earlier bags...
...I made an internal pocket out of one of the flaps, and lined it with
fabric.
To make the bag closure flap, I trimmed the felt to a uniform shape
(following the curve of the raw locks 'beard')...
...then made a buttonhole and added a large, wooden button.
To complete it, I machine stitched the handle together...
...and topstitched close to the flap edge for interest.
Labels:
full fleece,
jacob hoggett,
purse,
raw locks,
resist,
wool roving
Sunday, January 23, 2011
Orange and Raw Locks Purse- Part 1
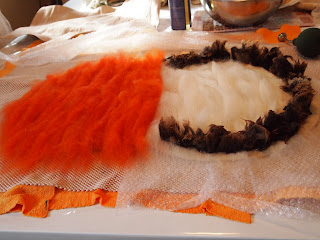
Orange and white wool roving.
Circular layout of raw Jacob Hoggett fleece.
More raw fleece (front of bag).
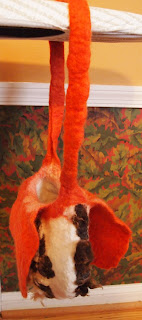
Stuffed and hanging to dry.
Now that I'm done making pillows for awhile (grin)...
...I've started making a lot of bags using my peanut-shaped resist.
Since this purse was going to be for me...
...my first thought was, of course, "orange"!!
I also decided that it might be fun to add raw locks to the piece...
...to see if I could make a bag that was a little bit wild! Giggle.
I started with orange and white wool roving...
...placing the darker wool at the top, for the handle and bag flap.
I added raw locks in a puddle to the bag's backside...
...and designed a 'beard' of locks on the front where the closure would be.
I felted this bag pretty hard...
...and the resulting surface is nice and pebbly.
Next time...
...the finished bag in all of its riotousness!
Labels:
jacob hoggett,
purse,
resist,
wool roving
Friday, January 21, 2011
The Very Last Gasp...Of The Pillows
Orange and gold pillow.
Half of my 2010 Christmas pillows.
Tri-color pillow with silk scarf inlay.
The tri-color pillow back.
I know, I know...
...you thought this day would never come! Giggle.
Yes, this is finally the last of my (many) pillows...
...and I think we will all be happy to move on!
Both of these pillows were gifts for blog-reading friends...
...so I couldn't surprise them with the 'what'.
I did, however, ask for specific color requests...
...so that they would be sure to please their recipients.
The orange and gold pillow was made with ribbon-like wool strips...
...prefelt bits and wool roving.
For the tri-colored pillow, I used wool roving...
...and a section of silk scarf to help connect the colors.
The backing fabric that you see was extra fabric from a long ago project...
...curtains for a house I no longer live in. :)
Labels:
Pillow cover,
Re-purposed,
Silk Scarf Bits,
wool roving
Thursday, January 20, 2011
Two Red and Green Christmas Pillows
Red and green wool roving and re-purposed wedding gown lace (not mine!).
The finished pillow (#1).
The back side (more European Christmas fabric).
Pillow #2 with red, synthetic dotted swiss fabric.
I wanted to make some seasonal pillow covers...
...which could be used just at Christmastime and then hidden away.
(Not everyone is as gung-ho about felt as we are!!) Giggle.
I cut squares of re-purposed lace for the first one...
...and made a checkerboard design with red and green wool roving.
For the second cover, I alternated wool roving with strips of synthetic fabric...
...leaving sheer, embossed dot areas.
I think I only have one more pillow cover to show you...
...and then I'm pretty sure you all deserve a medal for hanging in
there!! :)
Labels:
Christmas,
lace,
Pillow cover,
Re-purposed,
synthetic,
wool roving
Wednesday, January 19, 2011
Purple Protrusion Purse- Part 2
Finished purse with double-flap closure.
Purse with flap open for access.
Purse interior (no pocket).
Finished purse with blanket-stitching on the handle.
This is not a huge, 'daily needs' kind of purse...
...but was designed more for a fun night out...
...with room for a mirror, cell phone, lipstick and tissues.
Because I used both flaps for the closure...
...there's no internal pocket this time.
The double-flap design closes very tightly, though...
...and keeps things well-secured.
Instead of machine sewing the handle together like usual...
...I took the time to hand sew it with variegated white/grey/black embroidery floss.
Next time...
...more Christmas pillow covers!!
(Yeesh-will they ever stop?!?!?!)
Labels:
embroidery,
purse,
resist,
tube closures,
wool roving
Monday, January 17, 2011
Purple Protrusion Purse- Part 1
Peanut-shaped resist with black and white variegated roving.
The purple tube closure.
Cutting the handle.
Star slits cut for the closure.
I had in mind another peanut-shaped resist bag...
...as a Christmas gift for my dear friend, Dawn.
One of the best things about making felt pieces for other felters...
...is that you can get away with being even more outrageous than usual!! Grin.
Since she and her husband are two purple-lovin' people...
...I added a shot of that color (or should I say shock?) to this
demure black and white bag.
I wrapped the resist with several layers of wool, in the usual way...
...then added the tube closure.
After rolling it until it passed the pinch test...
...I cut out the handles and continued felting.
Once the bag was finished and dried...
...I cut a star slit in each of the two flaps.
This bag uses both cut out pieces for its closure...
...unlike the earlier ones which convert one flap into a pocket!
Next time...
...the finished bag with a smidgen of hand sewing. :)
Labels:
purse,
resist,
tube closures,
wool roving
Subscribe to:
Comments (Atom)


