Wednesday, December 31, 2014

Three New Christmas Stockings- Part 3 of 4

Working inside-out this time...

...I lay out a pencil-roving 'name'...

...and bits of blue wool at the 'heel and toe'.


                         The stocking is then covered with layers of Karakul roving...

                                        ...plus white wool (from a batt) at the top.


                                            The project is flipped to side two...


                                         ...and additional (hairy!) wool is added.


                                           A hanging loop is fashioned at the top...


                                                     ...and felting commences.


                                                                 As I work...


                                                   ...the 'assertive' green wool...

                                         ...begins to migrate into the white roving.


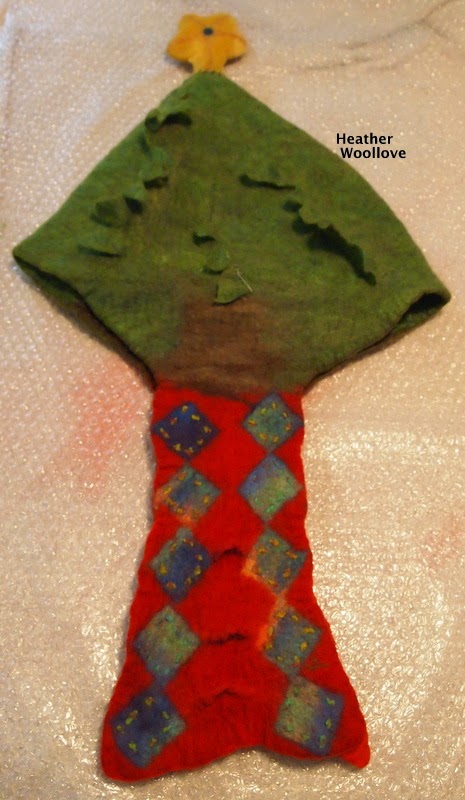
                                                   A new Christmas stocking...


                                        ...for my wonderful, soon-to-be son-in-law!


                                    Next time: a striped Christmas stocking for Mr. Green!

Monday, December 29, 2014

Three New Christmas Stockings- Part 2 of ?

Laying out red fiber from a 'mixed domestic wool' batt...


                                 ...and leftover white pre-felt from an earlier project.


                                    'Writing' my daughter's name in green pencil roving...


                                          ...and adding a pre-felt hanging loop.


                             Embellished pre-felt squares are applied to the back side...


                                      ...and then to the front (at the toe and heel).


                                                   Mid-way through felting...

                              ...the project is cut open and the resist is removed.


                                       Rolling the felt in an 'unnatural orientation'...

                                            ...helps to flatten the resist seams.


                                              Fulling the nearly finished project.


                                                The completed stocking (front)...


                                                                ...and back...


                                    ...and as part of our Christmas-time 'line-up'! :)    


                           Next time: a hirsute stocking made with 84% Karakul wool.

Saturday, December 27, 2014

Three New Christmas Stockings- Part 1 of ?

Laying out layers of variegated roving...


                                                       ...wetting them out...

                                        ...and shaping them into a tidy rectangle...


                                            ...then rolling them in bubble wrap... 


                                          ...to create a colorful sheet of pre-felt.


                                                                 Once dry...


                                        ...a rotary cutter and mat are employed...

                                          ...to cut the pre-felt into neat squares.


                                                  Using variegated wool yarn...


                                                ...and a large-eyed needle...


                        ...decorative stitches are made on the surface of each square.


                              Meanwhile, a stocking-shaped resist is being prepared. :)


                 You may recognize the variegated wool squares from my last project...

              ...(since I used them on my Christmas hat as a 'tree skirt' decoration, too).

                   Here, they will adorn the 'toes' and 'heels' of my daughter's new stocking...

                                               ...so 'stay tuned' for Part 2! :)

Thursday, December 25, 2014

"Bedecked Christmas Tree" Hat- Part 4 of 4 (Merry Christmas!!)

The finished hat...

...(modeled by my daughter Hannah)...


                                               ...sports battery-powered lights...


                                                      ...rows of jingle bells...


                                      ...faceted Christmas balls on golden cords...


                                                    ...and even an angel pin! :)


                    And just in case the hat doesn't attract enough attention on its own...


                             ...some of the lights are set to blink on and off, at intervals! ;)
      
           
                                                            As you can see...

                                       ...the integrated pocket in the 'tree skirt'...


                                             ...holds the battery pack perfectly.


                                              While it's not actually being worn...


                                            ...it makes a rather fine centerpiece...
      

                                                          ...don't you think? :)


                          Here, the mysterious Mr. Green stands in for my son-in-law...

                                                   ...(so I can check for size).


                                                 Merry Christmas, everyone!!!

Wednesday, December 24, 2014

"Bedecked Christmas Tree" Hat- Part 3 of 4

Handmade green pre-felt is trimmed into 'spiky' sections...


                                      ...and added to the surface of the project.


                                 It's prevented from 'felting into' the body of the hat...


                                     ...by pieces of thin plastic from a grocery bag.


                                                    Mid-way through felting...


                                 ...the piece is cut open and the resist is removed.


                            (The hat is flipped inside-out from time to time during felting...

                                                     ...to work on the seams.)


                                    Whew...the hat finally reaches its desired size!!


                                                 The fully felted hat...drying.


                                      At first, it reminded me a little of a dragon...
                      
                                           
                                             ...but as ornaments were added...


                                        ...its true nature began to reveal itself! :)


                                                 Next time: the finished hat!!