Sunday, April 29, 2012

Pink "Retirement" Purse- Part 2 of 2

Pinning the fabric lining and handle to the bag, prior to sewing.

 
The finished purse...

 
...and in close-up...

 
...and closer, still..

...(here, showing the top-stitching detail on the bag flap).

 
The reverse side...

 
...and in close-up.

 
Tiny (yet strong) earth magnets wrapped in fabric provide the closure.

 
The fabric-lined bag interior...

...with ladybugs and flowers!

 
I found a piece of pink seersucker fabric in my stash...

...and used it to make the purse lining.

I machine-stitched around the bag opening...

...and the edge of the front flap, as well.

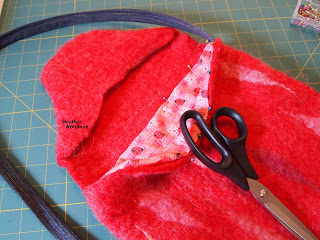
After trimming some of the excess felt from the flap...

...I sewed earth magnets into little fabric 'pockets'...

...and stitched them onto the bag for a closure.

I fashioned the handle from a length of denim fabric...

...cut from a discarded pair of jeans.

Posted by Picasa

Friday, April 27, 2012

Pink "Retirement" Purse- Part 1 of 2

Carded batts and merino roving for accents.


Rolling 'poufs' of merino roving... 
 
...and placing them on the resist.

 
Working from the outside-in (as usual)...

 
...and covering the poufs with sections of pink batts.

 
The black roving stripe is my 'cutting line'...

...so I don't get confused and cut open the wrong side!

 
After felting and turning the bag right-side out...

...here's the front (with black cutting line visible)...

 
...and the back.

 
I have a friend and co-worker who retired last week...

...after a 'mere' 43 years on the job!! :)

She's an amazing, energetic woman...

...and I'm sure that the next phase of her life will bring her great joy.

Because her favorite color is pink...

...I assembled merino roving in several rosy hues...

...and carded bright pink batts for the background, as well.

I pulled off small sections of roving and narrowed the ends into points...

...then placed them on the resist.

After covering them with sections of the pink batts...

...I worked the piece until it was fully felted.

Next time: the finished purse...

...with a ladybug fabric lining! :)

Posted by Picasa

Wednesday, April 25, 2012

Felt Cell Phone Cases- An Enjoyable Group Project!

Here, choosing colors of roving and pencil roving...

 
...are my beautiful friends! XXO-

 
Wrapping our sponges with fiber.

 
Felting and laughing...

 
...and talking and listening.

 
A finished case, prior to removing the sponge...

..."Look, Ma! I made it myself!!" :)

 
Our finished cell phone cases...


...the 'Papa Bear' one is for an iPhone. 
 
I had a group of dear friends here for a 'Women's Weekend' in March...

...and, as always, we had a wonderful time.

While thinking about something that we could do for fun...

...in the hours between their arrival(s) and our dinner reservation...

...I remembered this quick and easy project!

My MN friend, Becky is the genius behind this project...

...and it seemed perfectly suited for sitting around a table, laughing and catching up.

Starting with a regular kitchen sponge...

...(we stitched two together to make the resist for the larger-sized phone)...

...we wrapped it in layers of wool roving...

...finishing with pencil roving, to help hold everything in place.

After a quick dip in a bowl of warm, soapy water...

...and insertion into a zip-top baggie (remove as much of the air as you can before sealing!)...

...it was time to felt!

We squeezed and rubbed and massaged the baggies while we talked and laughed...

...and it didn't feel as if any time had passed before our wool had turned to felt!

We cut the ends of our cases open to remove the sponges...

...and continued felting for a bit to finish off the 'insides'.

After a rinse and some time to dry...

...our soft new phone cases were finished...

...ready for a little beading or embroidery...

...or no embellishment at all! :)

Posted by Picasa

Monday, April 23, 2012

Burlap Bag Totes- Part 2 of 2

The lined bag plus straps (front)...


...and back. 
 
Bag number 2 (with Moda alphabet fabric).

 
The finished tote #1...

 
...with a close-up of the handles...

...(and my upside-down lining!) :(


Luckily, there was no 'right' or 'wrong' direction for the alphabet print! :)


A close-up of the handles... 


...and the bag's back side. 
 
Since I wanted a little of the fabric to show at the top edge of each bag...

...I cut the linings a bit longer than the burlap.

Unfortunately, I didn't take into consideration the orientation of the blue fabric, prior to stitching...

...and my lining ended up 'upside-down'! (Yeesh)

After attaching the handles and pressing the totes, though...

...I don't think it's all that noticeable! :)

Next time: felt!

I promise!!

Posted by Picasa

Saturday, April 21, 2012

Burlap Bag Totes- Part 1 of 2

Two re-purposed burlap bags...

 
...and a fabric lining (with pockets!).

 
'Sandwiching' a layer of twill tape within each handle.

 
Pinning pockets to the fabric lining.

 
A second pair of purse handles.

 
After stitching the lining to the burlap bag...

 
...turning it 'right side out'...

 
...and sewing up the opening.

 
I recently purchased dried beans and wheat berries...

...and I was charmed by their printed burlap wrappings!

It seemed a waste just to throw them away...

...so I decided to make totes from them, instead!

I found companionable fabric among the pieces in my stash...

...and stitched up linings with pockets.

I fashioned longish straps, as well...

...lining them with twill tape for structural support.

Next time: the finished bags. :)

Posted by Picasa

Thursday, April 19, 2012

"The Starry Night" Purse- Part 2 of 2

The finished bag (front)...

 
...and in close-up.

(I think that this photograph makes it look like one big eye and a funny bulbous nose!!)

 
The bag back...

 
...and a detail of the dyed tussah silk additions...

...so shimmery!

 
I used a vintage button to close this purse...

 
...and I did hand-stitch the flap (below) closed...

...prior to giving it as a gift.

(Sorry-no photo.)

 
The 'resist twins' shown together...(fronts)...

 
...and backs

 
So, there you have it...

...two different purses made from the same resist.


It's interesting, isn't it, how slightly different wools and lengths of felting...

...so altered the size and shape of each bag?!?


Posted by Picasa