Wednesday, March 30, 2011

Machine-Pleated Pre-Felt Purse- Part 2

I think that the flap looks a little like a ginko leaf here, prior to trimming.


"Look, Ma...No stitches!"
After the bag was partially felted, I removed the large basting stitches that held the pieced pre-felt sections together.


The area of the purse bottom that required hand stitching.


The finished bag with double handle.


Because I put the pre-felt layer down on the resist first...

...and didn't adequately 'rough up' the back of it...

...there was a section of pre-felt which didn't completely felt to the other roving.

To fix the piece that was 'flapping' a little...

...I merely did a bit of hand sewing.

I doubled up the strap this time, to shorten it...

...and to anchor it...I tucked a section of strap under the flap which had become the inner pocket...

...and stitched it down, thereby holding it in place.

I was pleased to find a vintage button from my stash which matched so well...

...and all-in-all, it was a fun experiment.

(One I'll show you more of in a future post!)

Monday, March 28, 2011

Machine-Pleated Pre-Felt Purse- Part 1

Pre-felt piece after machine stitching.


Cutting (and piecing) the front and back panels.


The 'peanut shaped' resist with stitched panel and wool roving.


The wrapped resist.


Some time ago...

...I made a flower pillow with stitched pre-felt petals.

Since then, I've been wanting to try another project using this technique...

...and here it is!

I needed a 'thank-you' gift for a friend...

...and she absolutely loves the combination of purple and green!

In order to prepare the pre-felt panels...

...I combined several different colors of green roving that I had on hand.

When the panels were dry...

...I stitched lines of raised pleats along the length of the pre-felt.

I cut pieces of the panels to match the shape of the bag bottom...

...piecing, when necessary, with large handstitches...

...so that they could be easily pulled out after felting.

I put the pre-felt 'pleat side down' on the resist...

...and wrapped the resist with several layers of purple wool roving.

Next time, I'll show you the finished bag...

...and tell you about the little bit of 'stitching surgery' that I performed on it! :)

Saturday, March 26, 2011

Swap Gifts...All Orange, All The Time!! :)

Beautiful beaded flower, trivet, sachet, handspun yarn and cosmetic case from my friend, Kelly.


Close up of her beading and handmade cloth button.


Fabu journal, purse fob, brooch and special honey from my friend, Tracy.
(There were two additional Perthshire 'food gifts', as well, but my daughters and I ate them up before I could snap a photo!)


I especially love the striated red and orange bead!


As you may know from reading some of my other posts...

...I think felt and fiber artists are just the best people, ever!

Recently, I was lucky enough to arrange individual swaps...

...with two extremely lovely and talented feltmakers.

My friend Kelly is the author of "Felting Sunshine"...

...and a fellow orange lover!!

Tracy is a Scottish feltmaker...

...who writes the blog "narkeymarkey".

As you can see...

...they indulged me by making all of my gifts in my favorite color!!

Thank you both from the bottom of my heart...

...I will think of you with happiness each time I use one of my wonderful presents!

Posted by Picasa

Friday, March 25, 2011

'Spring Break" Throws- Part 4 (Fini!)

Wetting out the throw.


Dyed silk ribbon and a stylized bird.


Mushroom close-up after felting.


The finished throw.


Working in a larger format like this can be a little daunting...

...but since I had my daughter for company and help with rolling, this one was a breeze!

We used far fewer 'add ons' for this throw than for her twin's...

and tried to choose only the ones which we knew felted-in best.

I love the dyed silk ribbon that H-1 put at the top of the tree...

...a swap gift from my friend, Linda.

I was also really delighted with my daughter's pre felt bird...

...and its little protruding beak! :)

Because I absolutely LOVE each of my daughters...

...and prefer spending time with them to anything else on earth...

...this creative time with H-1 was very special to me.

But it also reminds me of how it feels when I have the opportunity to create with other felters...

...and what a joyful, inspiring and just plain fun thing that is!!

Posted by Picasa

Thursday, March 24, 2011

'Spring Break' Throws- Part 3

Laying out a pencil roving tree.


Felting with my girl(H-1)..."Oh, happy day!"


H-1 laying out a mushroom.


Using dyed silk hankies for boulders.


After we'd finished H-2's throw...

...H-1 decided that she'd like to design one for herself!

It was so exciting to watch her work...

...since I am not a very representational artist, and she sure is!!

I was impressed with how quickly and decisively she laid out her design...

...and in fact, the only elements that I'm not sure of now...

...are the parts that I added...the boulders, pre felt owl and bug!

In any case, she is very happy with the result...

...and I'll show you the finished photos next time!

Posted by Picasa

Wednesday, March 23, 2011

'Spring Break' Throws- Part 2

A close up of some of the wildness! :)


Cotton string, wool locks and Angelina.


Most of the inclusions felted in easily...but there were some stragglers!


The completed throw...just the right size for a dorm room bed!


Since this was an experiment...

...I expected some of our 'add-ons' to fall off or become loose during felting...

...and this is exactly what happened.

We anchored the more recalcitrant pieces, like velvets...

...with brightly-colored embroidery floss stitches.

We put a 'running stitch' along the length of some of the loose silk strips...

...and hidden stitches in the middle of the gold 'silk fringe poufs'.

I think that everything is pretty secure, now...

...and I really love the texture of the lace and silk pieces which did felt in well!

H-2 was delighted with her gift when she arrived home from college...

...and I think that H-1 may have been bitten (a little) by the felting bug through this experience. Yay!!

Next time...

...Part 1 of the throw that H-1 designed for herself!


Posted by Picasa

Tuesday, March 22, 2011

'Spring Break' Throws- Part 1

The layout for throw #1.


Lace detail.


Wetted out.


Angelina and cotton thread.


As much as I see the value in sampling...

...I find that I'd usually rather launch myself headlong into a project...

...and suffer the consequences later, if necessary! Grin.

My friend Kim has been encouraging me to try using more lace...

...and I thought that this might be a perfect way to sample lots of felted-in embellishments...

...and still get something useful at the end!!

Since my youngest daughters' college breaks only overlapped by a weekend...

...I had them each to myself for several days!

During her week home, and after some time spent just watching the layout...

...H-1 'got into the act' and started adding things to the surface of the wool, too!

We decided to go wild and use anything we liked from my stash drawers...

...lace, Angelina, yarn, silk gauze and fabric, pencil-roving, flax...all were fair game!

I knew that some of the inclusions would felt-in better than others...

...but this was all part of the experimental fun!

Next time, the finished throw (a gift for H-2)...

...and after that, you'll see what H-1 designed for herself!!

Posted by Picasa

Sunday, March 20, 2011

Gerbera Daisy Tote Bag With Beading

Gerbera daisies-my floral inspiration.


Laying out the fiber.


I think that this tote resembles a pinch-top vase.


The finished tote bag with small beads sewn onto each flower center.


I received some beautiful Gerbera daisies recently...

...and decided that their vibrant colors and basic design would make a pretty tote bag.

I laid out orange roving for the handle and bottom section on each side of the resist...

...then applied variegated orange, pink and red roving to the middles in a circular fashion.

I left a bit more of the finished felt than usual after felting...

...to make a higher, more pinched-looking top...

...which can expand to haul lots of items.

I made sprigs from four small, gold seed beads...

...and sewed three of them to each flower center (front and back).

As this is a present for a blog friend who likes orange almost as much as I do...

...I hope that she will be happy with her surprise!

Posted by Picasa

Friday, March 18, 2011

Open Sesame Scarf- Pushing the Envelope

Laying out wool roving.


Notice the sheen of the silk and wool blend.


The finished scarf-fully extended.


One more view.


Perhaps I'm a bit of a deconstructionist at heart...

...because every time I learn a new technique...

...I like to work with it until I find its logical endpoint.

I really wanted to see just how open I could make a 'Dawn-style' scarf...

...before it fell apart and was no longer, in fact, a scarf! Grin.

I used narrow sections of orange, yellow and red wool roving...

...and the blue silk and wool blend that you may remember from my previous post.

I laid out the scarf with just enough overlap and connections...

...to keep it intact during felting and beyond.

You may not want to go quite as far as I did here...

...but at least you may now have a better idea about how much fiber is really necessary.

Posted by Picasa

Wednesday, March 16, 2011

Silk, Wool and Dyed Blue Locks Bag- Part 2

The open bag in all of its orbicular beauty! :)


Notice the pearlescent, vintage button.


The finished bag with the flap closed.


The bag back with its dyed blue locks 'tail'.


After felting a purse like this...

...there's one important step that I haven't talked much about...

...and that's blocking.

It's important to pull the bag into shape with your fingers while it's still wet...

...then stuff it with fabric, in order to hold it in place while it dries.

After drying overnight, I remove the fabric (usually cloth placemats)...

...and finish drying it, empty, so that the desired shape is preserved.

I'm happy with the cute egg shape of this bag...

...and the way the locks and multicolored roving coordinate with each other.

Posted by Picasa

Tuesday, March 15, 2011

Caveat Emptor-Felting With Superwash

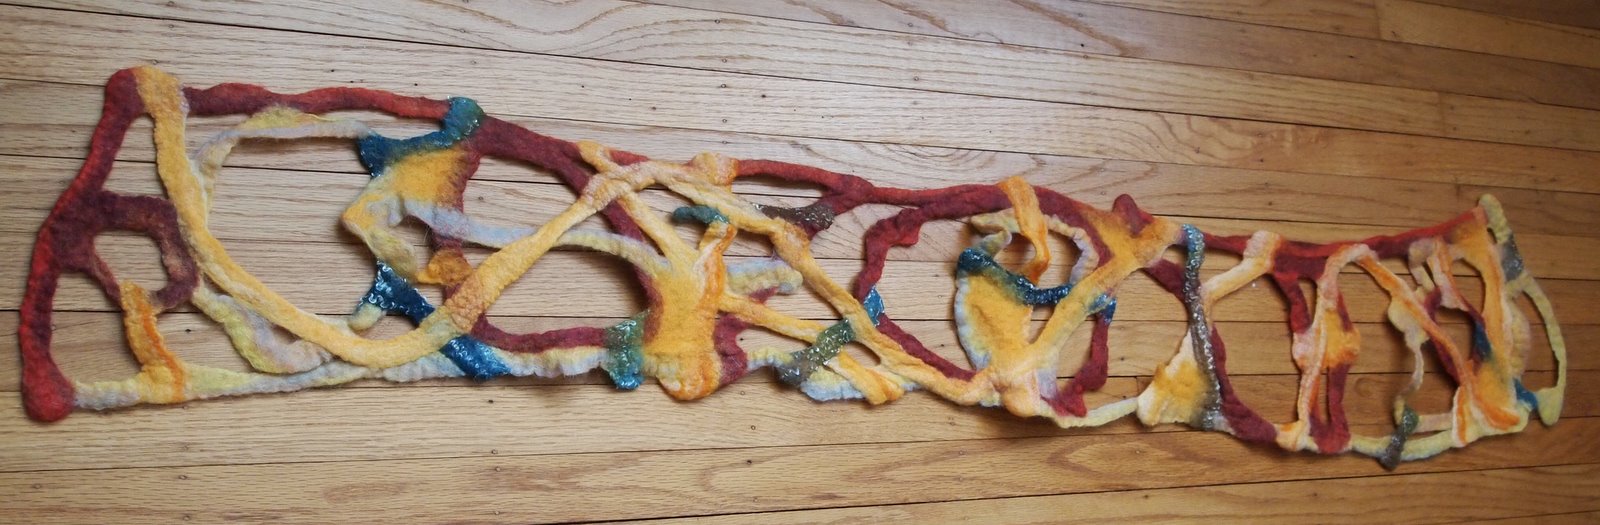
Silk and pre-felt that never felted in.


The peeling Superwash roving.


The exposed cheesecloth layer.


My ruined project.


I know that some of you are anxiously awaiting Part 2 of my latest purse...

...but something came up today that I thought deserved a post.

Like many felters...

I have a budget for my wool and other supplies.

That's why I'm always happy when I find a reputable source...

...that also has good prices (especially for bulk roving).

I had ordered ten pounds of 'Mill End Rovings' from a company recently...

...and, to be fair, on their website, they do state...

..."We try very hard to pick out all Superwash but we cannot guarantee that we might not miss some."

I guess their definition of 'some' is rather different than mine...

...since of my ten pound order, more than half was found to be Superwash.

Unfortunately, I didn't realize this until I had already ruined two projects...

...and I've posted photos of one of them.

When I wrote to ask for replacement roving...

...stating that I thought the honorable thing would be for them to add enough wool to reimburse me for my postage costs...

...this was the response that I received:

"Excuse me!!! This was not my error..........You obviously did not do any reading on our website at all. We do not guarantee that there will not be some Superwash in those bags. Technically those bags should not be sorted at all. If you will read.......we sell at that price because we are not supposed to do anything but take a big bag that looks good, weight it, and add in enough to make up the 15 lb. We also tell you in the writing that you should always test the rovings before using them for felting....for the simple reason that we cannot always tell them apart.........and the guys at the mill don't always recognize white Punta from white superwash and toss it all in the same box. That is the very reason we write the disclaimer into the information. It is on at least three pages...........I guess I'd better go in and make it bigger and make it in red letters. But that won't help if people do not read it. If you want to be positive that you are getting a straight wool, you will have to buy the #1 Rovings. We say this over and over.
You are demanding a whole lot here. I offered to replace your fiber.............I am not paying for your postage. How about my wasted time............my wasted energy.........my having to go to the post office and get the box, plus pack another box and haul it back. We don't get paid a salary here, if we did the prices would be double what they are and what most places charge. We try to help people, not gouge them. I am sorry you spent so much time.............I am sorrier that I spent so much time. And that I will still be spending more time. And you want me to pay for your postage to send it back, plus new fiber, plus pay the postage for shipping it back?? And you consider this honorable.............I consider it raping and pillaging. Just replacing your fiber will remove all profit from this order.....and beyond. Read the information on the Website......"
****************************************************

You would be correct in thinking that I will never order from this particular company again...

...and I caution you to watch for the above disclaimer when you order roving in the future, as well.

At this point, I've decided to just chalk it up to 'one bad apple' in the fiber world...

...and have decided that she is most certainly NOT a felter! :)

Posted by Picasa