Sunday, January 31, 2016

Hat With Geometric Pre-Felt Embellishments- Part 1 of 2

Applying pre-felt embellishments to the resist surface...


                              ....covering them with two thin layers of merino roving...


                                              ...and wetting the project out.


                                             After flipping the hat to side two...

                     ...pre-felt embellishments are again added to the resist surface...


             ...and the wool 'rays' from side one are wrapped up and around the resist.

                                            Side two is then covered with roving.


                                             To make the hat opening tidy looking..


                                     ...I fold the wool in at the bottom on each side.


                                                     Mid-way through felting...


...colored fibers from the pre-felt additions...

 ...are beginning to migrate through the white wool.


                                                    Removing the resist.


                                                Next time: the finished hat!

Friday, January 29, 2016

'Springtime' Hot Water Bottle Cover- Part 2 of 2

Before I get too far along in my felting...


                                 ...I remove the unfortunate strand of green yarn...

                                           ...on the back side of the project...


                                      ...and continue rubbing and rolling the piece.


                                                     Mid-way through felting...

                                 ...the resist and the painter's plastic are removed...


                                           ...and the cover is checked for size.


                                                  The finished felt (front side)...


                                                              ...and back.


                                 Two holes are made (and 'healed') during felting...


                                              ...a wider one for the flanged top...


                              ...and a narrow slit at the bottom for the hanging loop.


                                              The cover sizing allows the bottle...

                                          ...to be completely filled with hot water...


                                             ...for those long, cold, winter nights.


                                  The bottle in its festive floral garment (back side)...


                                                              ...and front. :)


Wednesday, January 27, 2016

'Springtime' Hot Water Bottle Cover- Part 1 of 2

Fashioning a resist pattern...


                                  ...and covering two-thirds of it with merino roving.


                                 The top edge is folded in (to create the first flap)...

                          ...and the layout is covered with a layer of painter's plastic...


                                             ...leaving uncovered margins...

                                          ...at the sides and bottom of the resist.


                                     After layering wool on side two of the resist...

                                        ...the project is flipped back to side one...
    
                               ...and fiber again is applied to two-thirds of the resist...

                                              ...(from the opposite end, this time)...

                                                    ...forming the second flap.


                                                My darling daughter, Hannah...

                           ...cutting embellishments from pieces of handmade pre-felt...


                             ...and applying them to the surface of the project (front)...


                                                              ...and back.


                                             As some of you may have heard...

                          ...we got a little snow here in Philadelphia, recently. ;)

                                         In order to help ward away the chill...

                 ...(and to remind ourselves that spring, indeed, will come again)...

                        ...we created this 'springtime' cover for a hot water bottle!

                                               Next time: the finished cover.

Monday, January 25, 2016

Ruffled Silk Nuno Scarf- Part 2 of 2

As the felting continues...


                                     ...a lovely, nubbly texture begins to emerge...


                                         ...and the brightly colored silk hankies...

                                    ...begin to 'sing' on the wool side of the scarf. :)


                     You may recall this earlier project (shown below, on the right)...


                                          ...made from rust-colored, pleated silk?


                                      Both of the fabrics used are shown below...
                             
                             ...with today's pale blue piece just opposite the rust one.


                                      The dark lines, visible in the finished scarf...


                        ...are areas where my wool 'tips' overlapped during layout.


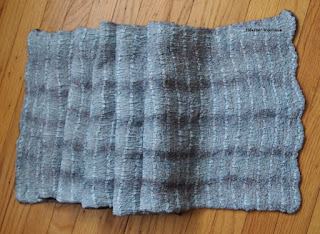
                                                  The finished scarf (silk side)...


                                                          ...and wool side.                                                 


                                       Because only one layer of fiber was used...


                                 ...the finished scarf is quite soft and drapeable.


                               In these photos, the scarf looks bluer than it actually is.

                                (It's closer in color to the second photo in this post).


                                                        In a 'happy accident'...                      

                     ...the slightly scalloped scarf ends formed themselves during felting!


Saturday, January 23, 2016

Ruffled Silk Nuno Scarf- Part 1 of 2

Assembling my supplies:

...pale blue ruffled silk fabric...


                                    ...and variegated tencel and wool blend roving.


                              Laying out a single layer of fiber on the fabric surface...

                                    ...(in the direction that I desire shrinkage most)...


                                               ...and wetting the project out.


                                                  A dyed Mawata silk hankie...


                                           ...is stretched to form a 'spiderweb'...

                                         ...and applied to the surface of the wool.


                                               The rubbing and rolling begins.


                                               Fulling the partially felted project...


                                   ...helps to tighten the fibers and shrink the scarf.


                                                 Next time: felting continues.