Saturday, March 30, 2013

Leather-Soled Pre-Felt Men's Slippers- Part 3 of 3

After wrapping each resist with layers of wool roving...

...and felting for a time...

 
...I cut a slit into the 'top' of each slipper...

 
...and turned it 'right side' out.

 
Using the finished slippers as templates, I cut out leather soles...

...then punched stitching holes around the perimeter of each one...

...prior to attaching them to the felt with nylon thread.

 
The finished slipper tops...

 
...and bottoms (suede side 'out').

 
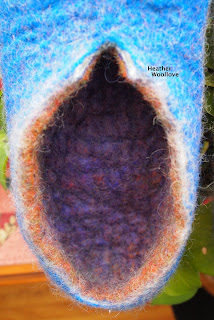
A view of one pebbly interior.

 
By utilizing pre-felt in this way...

...it was easy to create a pair of matching slippers!

 
My neighbor (and walking buddy) has a big birthday coming up...

...and a foot pampering pair of slippers seemed to be 'just the ticket'!

 I made them 'inside out' (as usual)...

...and took pains to keep track of which side was which...

...every time I added a new layer of roving.

To prevent them from quickly wearing through...

...(in case he pulls them on to go outside for the newspaper)...

...I added full leather soles.

'Fingers crossed' that they'll fit him when he finally tries them on! :)

Posted by Picasa

Thursday, March 28, 2013

Leather-Soled Pre-Felt Men's Slippers- Part 2 of ?

After tracing around my friend's sneakers...

...I added a margin for shrinkage...

 
...and cut out two slipper-shaped pieces of foam floor underlayment.

 
Using the resists as patterns...

 
...I cut out matching pieces of pre-felt for the 'slipper components'.

 
Next, a thin layer of wool (from a batt) was laid down...

...followed by the first pre-felt cut out (with the 'design side' facing up, toward the resist).

 
The foam resist came next...

...followed by a second piece of pre-felt.

 
The entire project was then wrapped in the bottom layer of wool...

 
...and wetted out...

 
Since this was a new kind of slipper for me...

...I estimated the size of the resist that I would need...

...based on a slightly enlarged tracing of my friend's sneakers.

Rather than wrapping the resist with wool roving like I usually do...

...I used trimmed pieces of pre-felt for the first layer on each slipper.

Besides being a nice little short cut...

...this was also an easy way to give the slippers a symmetrical look.

Next time: the remainder of the roving is added in the usual way...

...and my slippers start to take shape!

Posted by Picasa

Tuesday, March 26, 2013

Leather-Soled Pre-Felt Men's Slippers- Part 1 of ?

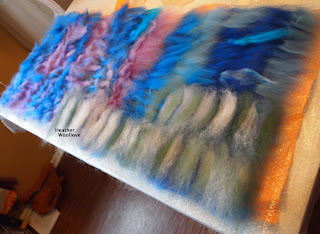
Laying out layers of solid-colored...

 
...and variegated wool roving...

 
...to make a large rectangle of pre-felt.

 
Wetting out the wool.

 
A close-up of the finished pre-felt on side one...


...and on side two.


A full view of the dried pre-felt sheet on side one...

 
...and on side two.

 
Since it's always good to have a few sheets of finished pre-felt on hand...

...I wasn't sure what I would make with this piece when I prepared it.

Using bits of (mostly) blue or variegated blue roving that I had on hand...

...I laid out several layers of wool in a large rectangle...

...covered them with soapy water (and bubble wrap)...

...and rolled the bundle fifty times in each of the four directions.

Next time: the pre-felt is cut into shape.

Posted by Picasa

Saturday, March 23, 2013

Hand-Dyed Two-Layer Purse- Part 2 of 2

Two dips in the dye pot and my white bag is utterly transformed!

 
After sewing the open end closed...

 
...I tuck one half of the felt into the other...

...to make the lining...

 
...then top-stitch around the opening to hold everything in place.

 
A green leather strap and buttonhole are added...


...along with a white ceramic button... 
 
...with a lovely, nubby texture.


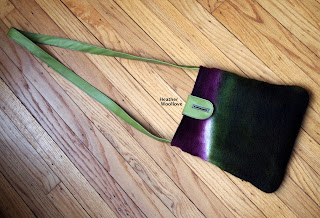
The finished bag (back).

 
Having a newly denuded bag at my disposal...

...and a master dyer on the premises...

...(my friend, Lorin Fields during her recent visit)...

...I decided that it would be fun to do something really bold with this project! :)

Emulating the zesty style of my sweet friend, Fiona Duthie...

...we 'double dipped' the piece in olive and boysenberry acid dyes...

...leaving a 'slice' of white in between.

To finish the bag, I sewed up the open end...

...tucked the 'lining' into the bag itself...

...and stitched around the top to keep the insides from pulling out again.

A leather strap and buttonhole were fashioned and added...

...and a fun button was chosen from my stash to finish it off!
Posted by Picasa

Thursday, March 21, 2013

Hand-Dyed Two-Layer Purse- Part 1 of 2

Laying out strips of re-purposed silk...

...(from thrift store blouses)...

 
...and covering them with merino roving.

 
After flipping the resist to side two...

...I can check on my design through the plastic. :)

 
Adding layers of wool, a thin plastic resist and cotton gauze...

...for an internal pocket.


After felting for a time...

..the resist is removed. 


As you can see, the silk strips were quite tightly woven...

...and 'did not want' to felt-in without additional work on my part.
 
The internal pocket, after felting.

 
Cutting the felt to remove the thin plastic pocket resist.


This is one of my experimental 'flub and rescue' projects. :)

After seeing a cute, narrow purse in a museum gift shop in Hamburg in December...

...I got the idea of making a long, narrow resist...

...covering it with a scant amount of roving (to make thin, flexible felt)...

...and then tucking half of it inside the bag, to act as its own lining!

After felting the piece for a short time with the resist in place...

...I removed it, only to find that my silk strips were far from felted-in.

Because I wasn't wholly invested in the look of the embellishments...

...and because sometimes I just want to move along with a project...

(This is spelled L-A-Z-Y) 

...I yanked them all off and finished felting the now totally white bag.

Next time: how a white bag becomes the perfect canvas for another idea...

...and how the dyeing style of one friend...

...and the dyeing technique of another...

...save the day!! :)

Posted by Picasa

Tuesday, March 19, 2013

'Silk Bits' Nuno-Felted Bag- Part 4 of 4

Making a buttonhole in the leather.


Fashioning a long leather strap...
 
...and stitching it to the reinforced 'footer' on the back of the purse.


Attaching a small leather loop to the lip of the bag.
 
The completed closure with button.

 
The finished purse...

...with flowers in matching colors! :)

 
The back side of the purse.


Voila! The completed bag...

...ready to hold lots of life's little necessities! :) 
 
Because of its 'wide mouth' opening...

...I needed to create a different kind of closure this time.

Using trimmed pieces of green leather...

...I fashioned a long strap and a loop for the leather button flap.

The 'footer' provides a reinforced area on the back of the purse...

...for the strap attachment...

...and the button is easily sewn to the bag...

...through the holes punched in the leather flap.

Posted by Picasa