Thursday, February 16, 2012

Machine Stitched Kindle Cover

Covering the resist with layers of wool roving.


The back of the closed cover...


...and the opened front.


A close-up of the vintage button.


The opened back of the Kindle cover.


A close-up of the braid closure...


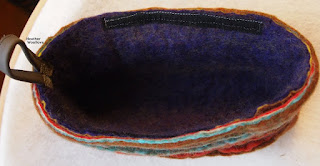
...and peering inside.


The finished cover in use.


After I made a cover for my daughter's Kindle...

...I decided to make one for myself, too!

I used pale orange and yellow wool for the exterior...

...and deep blues and greens for the interior.

When it was finished, I thought that the blended colors cooked a little drab...

...so I did some machine embellishment to jazz it up! :)

Using a Lucet tool, I made a short braid for the loop closure...

...and paired it with a wonderful 'citrus cross section' vintage button from my stash.

Posted by Picasa

Tuesday, February 14, 2012

Twin Pre-Felt Purses- Part 2 of 2

Pinning one half of the felt in preparation for stitching...


 ...trimming the corners...


...and pinning the purse bottom into place.


After machine stitching, the purse is no longer a mere envelope.


The front of one of the finished purses...


...and its fraternal twin. :)


The back sides...


...and the fronts again, with leather straps and button loops, and art deco buttons.


Sometimes, when you make a purse...

...a flat, envelope-style bag is exactly what you want.

In this case, though, I wanted room for a wallet, cell phone and keys...

...without a lumpy, bumpy, "serpant qui a mange un elephant"-look. :)

I cut the finished felt into two roughly equal pieces...

...and stitched each section into a flat rectangle with a flap.

I used the raw edges of the finished felt for the flaps...

...so that each one looked a bit organic and unique.

I cut a square of felt from each bottom corner...

...and pinned the new, wider bottoms into place for sewing.

I attached a grey leather handle to each bag...

...and added a leather loop and reproduction deco button for the closure.

Since the felt piece was so large, these are quite generously-sized bags...

...and their 'adoptive mothers' were very happy to receive them at Christmas! :)

Posted by Picasa

Sunday, February 12, 2012

Twin Pre-Felt Purses- Part 1 of 2

Laying out snippets of pre-felt onto bubble wrap...


...and covering them with cotton candy colored, hand-dyed roving.


Wetting out the piece and starting to rub...


...a little progress has been made. 


The finished felt 'yardage'...


...and in more natural light.


A close-up of the chaotic design...


...and the back side of the finished felt.


Every once in awhile, I look around the studio...

...and notice that my fiber supplies are getting a little out of hand.

As Christmas was approaching, I decided that I would use a portion of my saved pre-felt snippets...

...to make a piece of felt 'yardage' for making gifts.

I laid a dense mat of pre-felt pieces onto a section of bubble wrap...

...and covered them with layers of hand-dyed wool roving.

I wetted out the piece and rubbed and rolled until the 'bits' were all incorporated into a nice, firm felt...

...then rinsed it out and let it dry for the next step in the process.

Next time: twin bags are born...

...with leather straps and retro button closures.

Posted by Picasa

Friday, February 10, 2012

Multiple-Resist Ruffled Clutch- Part 2 of 2


After removing the resists and completing the felting.


The end result of using so many layers of roving? 

A finished felt that is far too thick and stiff. :(


After stitching on strips of velcro and a leather loop.


The clutch, open...


...and closed.


I was tempted to make it into a basket for rolls, but it was a bit too small. :)


The...sighhhhh...not-very-impressive ruffles...


...and a side-view.


I really don't mind working hard...

...but I like the finished piece to actually reflect it. :)

I attempted a zipper closure when this was clutch was first completed...

...but working on felt as thick as this proved to be folly...

...and I gave up in frustration and settled on velcro, instead..

I took my time, felting each 'ruffle layer' as I removed each resist...

...but the end result is unsatisfying 'stumps' of ruffles and not true ruffles at all.

I know that there must be a better way of making a ruffled bag...

...but it may be using sewn-on-after-felting ruffles, and not resists at all.

I also know that I'm missing something important about the use of multiple resists...

...but I'm just not sure what that is.

Luckily, one of my 'felt scavenger' daughters snapped it up...

...and now, it's 'out of sight and out of mind'! :)

If any of you readers have had success with a project like this...

...please do write with suggestions and put me out of my misery!! Giggle.

Posted by Picasa

Thursday, February 9, 2012

Multiple-Resist Ruffled Clutch- Part 1 of 2


Covering the resist in a layer of aubergine roving...


...and then adding a bright yellow layer.


Multiple 'strip' resists with multiple colors for fun...


...Christmas colors, anyone?


The layers and resists are piling up...


...here, one last shot of color before I envelope the entire piece in layers of orange batt.


Using a felting stone to work on the many-layered piece.


The partially felted clutch...innocuous-looking in its 'un-snipped' state.


This is an experimental project that I made some time ago...

...that I'm not exactly wild about.

You see...other than making a few internal purse pockets or 'multi-lobed' bags...

...I really haven't had much experience with multiple resists.

I wanted to explore the possibility of using 'stacked' resists to create decorative ruffles...

...and I decided to start small and make a sturdy little clutch.

After fashioning a resist and covering it with several layers of fiber...

...I placed layers of multi-colored roving between each 'strip' resist.

As the stacks of small resists rose in height, I felt a little like I was playing Jenga...

...and they seemed to wobble and shift within the fiber layers in an unnerving way.

The trickiest bit was trying to firmly felt the small, connecting areas between the 'stacks' of resists...

...and I finally resorted to using a felting stone on these narrow, indented sections.

I'm pretty sure that placing the two sets of strips so close to each other...

...caused at least some of my struggle...

...but before I give this technique up for good...

...I would relish tips from those of you who have figured it all out!

Next time: the finished clutch...

...with a velcro closure and leather 'loop'.

Posted by Picasa

Tuesday, February 7, 2012

Long-Languishing Cobweb Scarflette


Wetting out a layer of variegated green merino roving...


...and rolling it in bubble wrap to open up some 'cobwebby holes'.


Adding a pop of color in layer number two.


The 'fish tail' end of the finished scarf (showing the brightly-colored side)...


...and the reverse, with the original green layer showing.


Doesn't this end resemble the pincers on an earwig? :)


Here, a demure bit of bright color peeps through the lacy texture of the original green roving.


I confess that I have rather ambivalent feelings about cobweb felt...

...and I've been trying to sort out exactly why.

I know that its fragility concerns me a bit...

...since I like my projects to be able to withstand quite a lot of abuse! :)

I also think that they are slightly more feminine than most of my pieces are...

...and I find myself uncertain about the 'end point' as I work, as well...

..."Is it soup, yet?" :)

In any case, this was a project that I made last summer...

...that I'm finally sharing with you.

**************************************************************

I laid out a layer of green variegated roving, wetted it down...

...and rolled it energetically in bubble wrap in order to open up some holes in the felt.

I used a couple of other fun colors for layer two...

...and felted the piece until it held together well, but was still soft and pliable.

I like how the colors from the second layer show through the open spaces in the first one...

...and the wonky ends of the scarflette really appeal to me, too...

...despite (or perhaps because of?) their rather biological appearance!! Giggle.

Posted by Picasa