Showing posts with label craft foam resist. Show all posts

Monday, November 12, 2012

'Grapes Project' From A Summer Workshop

Laying out two very thin layers of wool...

 
...in colors that I love...

 
...and colors that I 'resist'. :)

 
Filling each circle with something...

...and tying them tightly with nylon string.

 
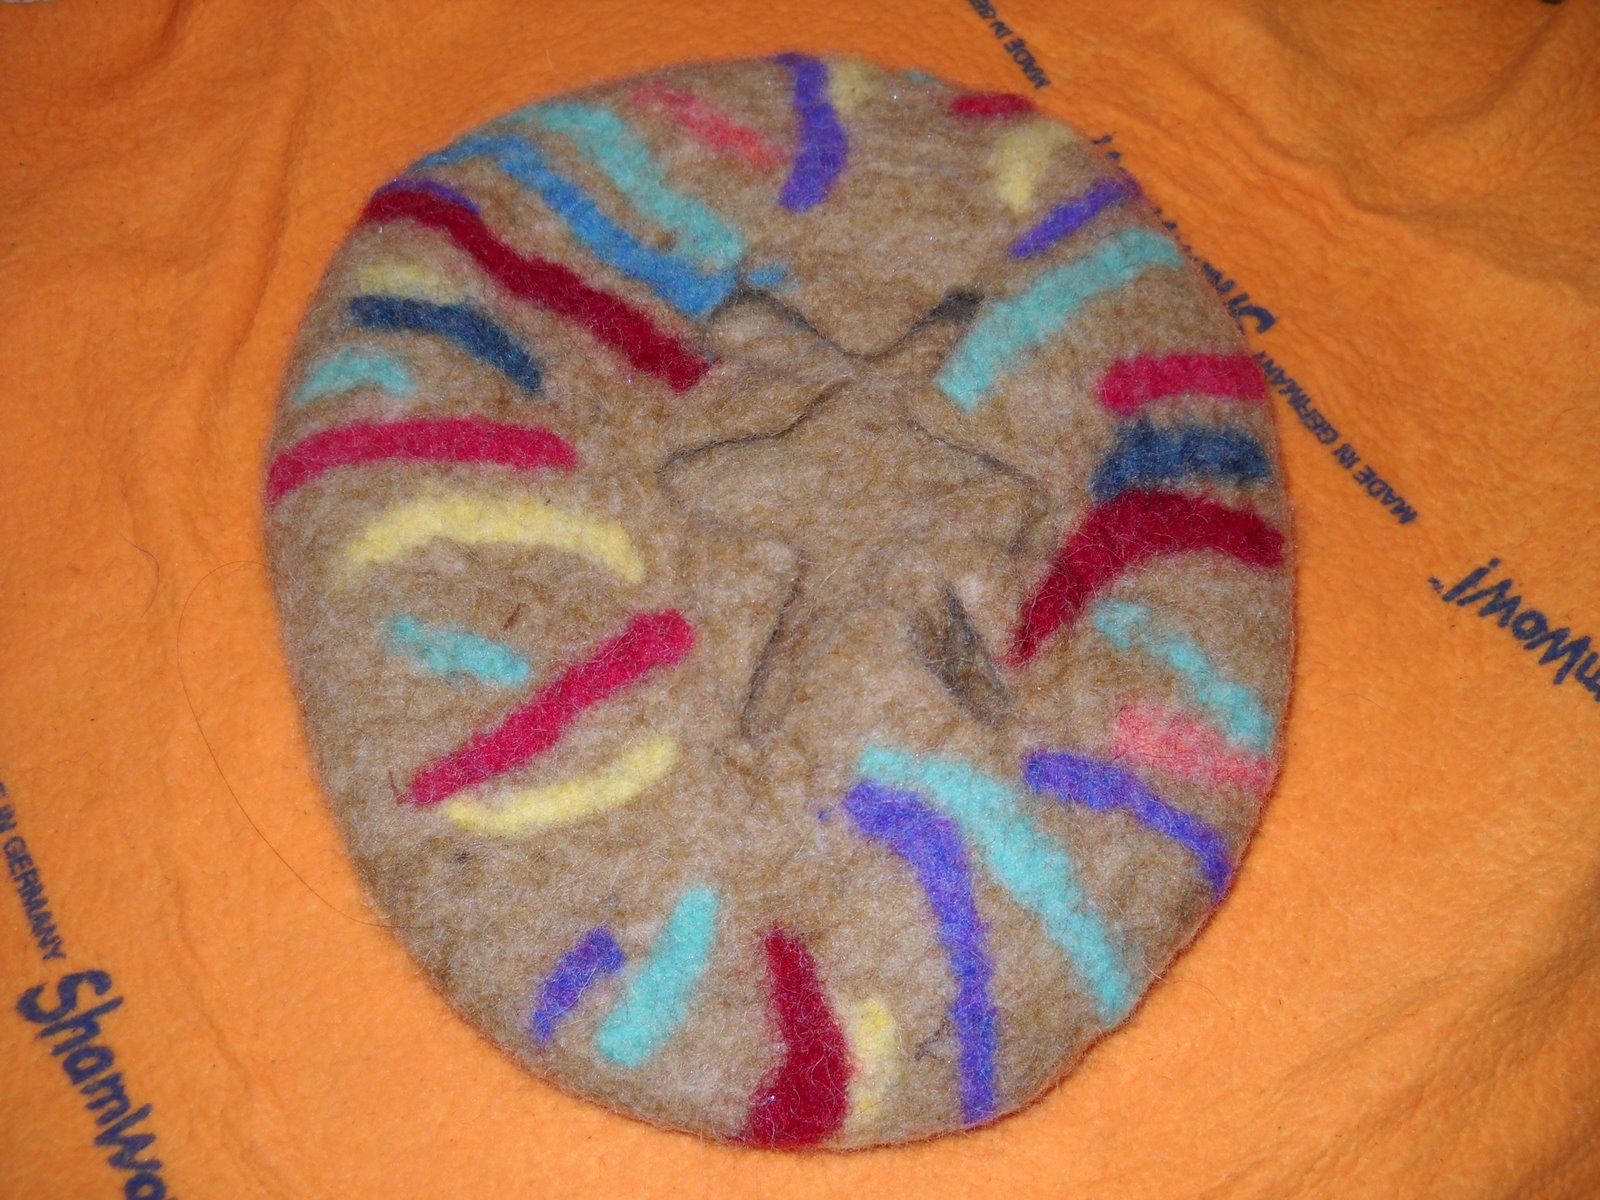
After felting the piece and removing the string...

 
...you can see the filled protuberances...

 
...and the empty ones which were originally filled with stones or bits of plastic.

 
My finished sample.

 
I'm afraid that this post has arrived a bit out of order...

...since this project pre-dates my recent red purse post...

...yet these techniques informed the making of that bag.

This sample was from my wonderful class with Marjolein Dallinga this summer...

...and it was a really interesting project to do.

We used very thin layers of wool to make a pre-felt...

...and stuffed hand-stitched pre-felt circles with things like stones, raw fleece, fabric and foam.

For me, the really 'magic' part came...

...when it was finally time to cut open the tops of the 'grapes' and peek inside!! :)

Posted by Picasa

Friday, April 23, 2010

Octuplets-Preparation


Posted by Picasa


You may have noticed that I don't really enjoy making more than one of a kind of something...

...manufacturing items would make this felting thang less fun for me and more like work. Shudder.

But, occasionally, you just have to 'tough it out' when faced with a need...

...like when I made all of us new Christmas stockings last year.

I needed eight somethings for a Women's Weekend event...

...as gifts for women friends whom I've known and loved for over twenty years.

So, I spent quite a few hours cutting small remnants of pre-felt into bits...

...julienned strips and a small dice that reminds my daughters of a bowl of multi-colored salsa! :)

I had been reading about the use of a salad spinner for removing excess water from small felted projects recently...

...and boy, does that work well!!

I'm sure some of you can guess what these turn out to be...

...but the rest of you will have to wait for the reveal...

...next time!

(Giggle)

Thursday, April 8, 2010

Act 2: Dragonfly Purse


If you looked closely at the lining photos in my last post...

...you will have noticed that half of the lining is 'upside down'.

This is one of those things which happens to me a lot while I'm sewing...

...see why I'm primarily a felter, now? Grin.

When my bag was finished and dry...

...I sliced across the top with my rotary cutter, making a straight edge.

Next, I traced the bag outline on paper for a lining pattern...

...adding a 1/4th inch seam allowance all around (1/2 inch for the top edge).

After cutting, I added a pocket to each side of the lining...

...and sewed the lining front and back together...

...leaving the top open, but folding the edge over twice for a neat seam.

After looking at my re-purposed belt pieces again recently...

...I realized that 'thinnner is better' (at least for straps!).

So...I cut the wider strap into two 1/2-inch-wide lengths...

...and sewed them to the lining (wrong side) with a leather sewing machine needle.

I stuffed the lining into the bag, placing the top edge even with the bag edge...

...and making sure it fit well down into the bag recess, then sewed it all around.

A magnetic purse closure was hand-sewn into the bag for security...

...and one of my cloth labels.

I like these straps so much better than the single one on my flower bag...

...that I'm going to remove, cut-up and re-attach the strap on that purse, too!


Posted by Picasa

Act 1:Dragonfly Purse


I just can't seem to stop making purses...

...and today I felt inspired.

I cut some bug-eyed dragonflies out of pre-felt...

...similar to those I saw somewhere on the web, gracing a lovely table runner.

(If any of you know the source of my inspiration, please let me know so that I can properly acknowledge her.)

I wanted the bag to be a specific yellow color...

...to match the yellow twill tape that I intended to use for straps.

To get the right shade, I used peach wool for the second layer...

...so that the pink would show through a bit and 'color' the yellow.

(Of course, I later changed my mind about the straps...see Act 2.)

I haven't been 100% happy with the insides of my bags so far...

...having had a little trouble with pocket resists.

I've decided that the purses would be more functional and sturdy...

...if I sewed fabric linings for them...so that's what I attempted this time.

More about how I made the lining and why I changed the straps next time...

...plus the finished bag!

P.S. It's really cute.

Addendum: Please see Filz-T-Raum's blog post here.
She graciously reminded me that it was her blog which delighted me with
it's 'buggy charms'! :) Thanks so much!!

Posted by Picasa

Tuesday, April 6, 2010

Les Fleurs Du Mal


Because I am primarily self-taught...

...I'm always trying to puzzle out how to do new things with felt.

I wanted to try making some flowers...

...for use as decorations on future projects.

I had this great idea...

...(or so I thought).

I would make a base resist in a circular shape...

...plus two smaller circles with identical holes cut into the middle of each.

I thought that rather than sewing the three layers together after felting...

...I could attach the three layers during the felting process-bing, bang, boom! :)

After felting, I cut around the edges of the top two resists...

...and pinched up the felt, forcing it through the holes in order to pull off the resists.

This method works well with thin layers of fiber...

...and you must make certain to work the center hole well if you don't want the layers to fall apart.

The thing is, though, I still had to stitch the base to form them into 'real' flower shapes...

...and I'm pretty sure that making three separate felt disks would have been just as easy (and less fiddly).

Sighhh.... (giggle)


Posted by Picasa

Friday, March 5, 2010

Purse-picacious


I am definitely digging these new bags!

Of course, it didn't take long for H-1 (one of my twins)...

...to 'put her dibs in' for the next one!

I used two colors of variegated roving for the body of this purse...

...an orangey-red and a yellowy-pale blue (if you can believe it!)...

...and some variegated pencil roving and dyed flax (thanks, Kim)...

...for the sunny design.

I wanted to find new options for the straps...

...and in this way, keep the bag a little deeper and roomier.

(In the previous bag, the straps were cut from the top of the purse.)

My daughter chose some plain, eggshell-colored bamboo fabric for the straps...
...and I made slits in the felt for the horizontal one...

...covering the machine sewing of the shoulder strap to the purse.

My daughter added one of my handmade buttons to the front for a little detail...

...and now she's happily using it!


Posted by Picasa

Tuesday, March 2, 2010

Finished Resist Purse


I see the shocked expressions on the faces of my regular readers...

...she embellished something!! WOW!!

I know, I know...

...many of my projects would benefit from a little 'jazzing up'...

...but I don't usually have it in me.

This time, however, this project was screaming for a blanket stitch...

...and I couldn't resist using some of my Christmas buttons, either.

I used several different colors of embroidery floss (all 6 strands) along the edges of the purse and straps...

...and I sewed the straps to the bag with upolstery thread before sewing on the buttons.

To keep it secure, I sewed each half of a snap to a piece of twill tape...

...and then sewed the tape into the bag on both sides.

I think the closure won't be as hard on the felt in that area as if I just sewed the snaps to the purse itself.

The bag is nice and sturdy and will take the place of my ancient 'work purse'...

...and it even has an inside pocket! :)

Posted by Picasa

Sunday, February 28, 2010

New Resist Purse-Beginnings


I love to make felted items and give them away...

...for some recipients, it's their first experience with handmade felt...

...and I feel like I'm encouraging others to love it as much as I do.

I also think surprising friends and family with presents is just a lot of fun...

...and I get to make more things than I could possibly use, myself.

Sometimes, though, I find that I've made an item for lots of others...

...and have neglected to make one for myself! :)

So...I decided to make myself a purse.

I had some wonderful things in my stash that I'd been dying to use...

...some sari silk waste which is just glorious...

...in all different colors of silk threads for sheen.

I also had some bright and friendly wiggly yarn...

...you knitters out there will know the correct name for yarn like this (please leave a comment!)

I wanted to try making a bag inside out this time...

...since I like the additional mystery...

...after all, once you cover it up with fiber and start the felting process...

...you can't tell what it will look like until it's nearly completed!

Stay tuned for my progress!!

Posted by Picasa

Friday, January 15, 2010

Fiber-licious Purse


For this purse, I decided to use a resist and then cut it open to form the flap and bag portions.

I wanted to use some of my strange fibers...

...and different merino top colors...

...to add a little 'arty' interest for a change.

I used some curly locks and flax wisps...

...and decorated both the outside...

...and a little on the inside, too...

...to coordinate the 'look' when the purse is closed.

When it was felted and dried...

...I sewed the resist opening in the flap with tiny stitches...

...and made a rolled strap from roving, using my sushi mat.

I sewed a snap onto it for a closure...

...and sewed the strap to the purse sides with strong thread.
Posted by Picasa

Wednesday, January 13, 2010

H-1's Slippers


I used the same template for H-1's slippers as I did in the last post...

...the beauty of felting being that you can stop felting when they reach the perfect size!

I made the inside with the beautiful variegated roving, last seen in my scarf post:

http://woollove-functional-fiberart.blogspot.com/2009/11/variegated-roving-scarf.html

...which felts up into a strange (and not too attractive) greyed-green shade...

...and the outside with a rich burgundy red.

Of course, H-1 insists upon wearing one 'right-side' out...

...and one 'wrong-side' out-just to be different!

(As if we're already not different enough in this house!) Giggle.

The 'action photo' is of H-1 felting one slipper to the right size...

...after I had rolled and thrown and rubbed it to a nearly-finished firmness.

Nicola recently posted about using liquid latex and ground dried corn for the soles.

http://clasheen.wordpress.com/2009/12/31/latex-soles-for-felt-slippers-cold-spell-continues-and-happy-new-year/

I'll have to look and see whether craft stores sell the liquid latex here in the US.

(I wonder whether the corn falls off as the slippers wear?) :)

My next slipper attempt may involve a thicker end product (more layers)...

...and a latex sole.


Posted by Picasa