Wednesday, May 30, 2012

Striped Cotton Sliver and Flax-Embellished Purse

For a deeper purse this time, I made a longer resist.

 
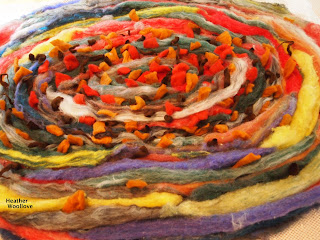
Adding tufts of striped cotton sliver...

...and long wisps of flax.


Adding a layer of yellow wool roving. 
 
After several layers of wool were added to both sides of the resist...

...(the black roving stripe marks my cutting line).

 
Removing the resist and turning the purse right-side out.


Drying the finished felt. 
 
The fully felted and dried piece, prior to adding a lining.

 
A close-up of the cotton and flax additions...

...and the black roving 'cutting line'.

 
The purse that I made most recently to use as my 'work purse'...

...now seems way too autumnal for our latest heat wave...

...so I decided to make myself a new one! :)

I chose yellow, because I think it's a fresh and sunny color for summer...

...and I dug around in my stash for some long-neglected embellishments to use!

(I last used the un-dyed flax wisps in this piece...

...and the cotton sliver was last seen here.)

I added a thin strip of black roving to one side of the resist each time that I laid out new wool...

...so I wouldn't lose track of my 'cutting side' or its placement.

Next time: the finished purse...

...with a fabric lining and strap.

Posted by Picasa

Monday, May 28, 2012

Happy News...My Eldest Daughter Is Engaged!!!

My daughter and her boyfriend at Christmastime...

 
...and now, they're getting married!!

My eldest daughter and her boyfriend have had a fairy-tale romance...

...meeting as young teens, dating, and taking some time apart in college...

...then coming together again after they realized that they were truly each other's one-and-only.

And even though, in many ways, I've felt like they were already married for some time, now...

...I was unprepared for the raw emotion that I felt on Saturday...

...when she burst into my bedroom, waking me, in order to share her happy news!!

At this very moment, while thinking of their happiness, my joy is boundless...

...and even the practical, maternal side of me is at peace...

...knowing how safe she is with him, and how very much he loves her.

So...no felting projects today...

...just me, shouting from the rooftops that my baby will be a bride! :)

Posted by Picasa

Friday, May 25, 2012

Two 'Make Ahead' Memorial Day Appetizers

Cutting the cheese straw dough into pieces with a pizza cutter...

...after rolling it out onto a floured surface.

 
Some flat ones after baking...

 
...and a few that I twisted, first!

 
A close-up view of one straw's golden deliciousness! :)

 
Ready for storage...

 
...and set out, for an informal crowd, along with wine and some sweet, spiced nuts.

 
I don't often make appetizers...

...and when I do, they must be easy...

...(my 'old standby' consists of a block of softened cream cheese...

...covered with a layer of warmed, hot pepper jelly or soy sauce plus toasted sesame seeds.)

The two appetizers (above) are a bit more complex than that...

...but I think you'll find them well worth their preparation time...

...especially because they can be made several days ahead.

Sweet and Spicy Almonds


1/3 cup sugar
1/2 tsp cayenne pepper
1 tablespoon Chinese five-spice powder
1 egg white
1 pound (3 cups) whole raw almonds

Heat oven to 300 degrees F.
Line a baking sheet with nonstick foil
Whisk sugar and spices together in a small bowl
In a medium bowl, whisk the egg white until soft peaks form
Add almonds, sugar, and spices, and toss with a spatula until well coated
Spread into an even layer on the prepared pan
Bake for 40 minutes, stirring once
Loosen nuts on the sheet and cool completely
Store in an airtight container at room temperature for up to 1 week


Cheese Straws


1 & 1/2 cups of shredded cheese
(I used a mixture of hard and soft cheeses, including Parmigiano-Reggiano and blue cheese)
2 ounces unsalted butter (cut into pieces)
3/4 cup flour, plus extra for rolling out the dough
1/2 tsp salt
1/2 tsp crushed, dried, rosemary leaves
1 tbsp milk or buttermilk

Preheat oven to 350 degrees F.
Combine all ingredients in a food processor and blend until the mixture forms a ball.
Roll the dough out into the shape of a large rectangle on a lightly floured surface...
...and cut strips (straws) from it, using a pizza cutter.
Transfer the straws to a cookie sheet and bake for 12 minutes or until golden brown.
Cool (completely) on a rack, and store in the refrigerator in a tightly closed container...
...until it's party time!

Posted by Picasa

Wednesday, May 23, 2012

"Stash-Busting" Cat Bed- Part 2 of 2

The wetted out project during felting.

 
Clamping the finished felt into place to dry...

 
...using cans, bottles and a heavy 'pizza stone'...

...to shape and weigh down the center section of the bed.

 
The finished project with built-in cat toys...

 ...(check out the sproingy little 'wiggly bits' of felt!)

 
Erykah trying it out for size...

 
...and, here, in an 'action shot'! :)

 
"Hmmmm...what's in this corner?"

 
And finally, her patient sister, Chloe, gets a turn.

 
The felting on this project was pretty straightforward...

...but I did need to stitch it together in a couple of spots where there were gaps between the spirals.

To shape it while drying, I weighed it down with a large, round pizza stone...

...plus several heavy cans and bottles.

Once dry and 'formed'...

...I machine stitched the pleats into place.

I think the girls must be pretty happy with their new 'nest'...

...since it hasn't been empty since I made it...

...and I've even found them both crammed in there together! :)

Posted by Picasa

Monday, May 21, 2012

"Stash-Busting" Cat Bed- Part 1 of 2

Needle-felting together strips of art batts...

 
...lots and lots of batts!


Cutting up bits of 'ribbon roving' and partially felted bits from a failed project.
 
Beginning the jelly roll...

 
...and making it larger...

 
...and larger!


The layout, just prior to wetting out... 
 
...and just after.

 
In April, while anticipating the Sheep and Wool Festival in May...

...I took stock of my stash and put on my 'thinking cap'. :)

From a huge pile of mediocre rovings...

...I carded lots and lots of multi-colored batts.

I also found some leftover commercial roving...

...that had been overheated while dyeing, and was quite 'ribbon like' in appearance.

From another bag, I pulled out a few brown, partially felted wiggly bits...

...that had started life as part of a failed scarf.

After cutting the batts into wide strips...

...I wound them into a spiral...

...adding snippets of 'ribbon roving' and wiggly bits as I went along.

Next time: how I shaped the finished felt into a bed...

...and the obligatory 'cute cat' photos! :)

Posted by Picasa

Friday, May 18, 2012

Pencil Roving Purse- Part 2 of 2

The fully felted bag (while still wet)...

 
...and after drying (side one)...


...and side two. 
 
Cutting a purse strap from an old pair of jeans...

 
...and using variegated thread to stitch it up.

 
The finished purse, initially...

 
...and, later, after shortening the denim handle.

 
Rare-earth magnets, encased in floral fabric, form the closure.

 
The softness and loose texture of pencil roving...

...allows it to felt quickly and easily into any finished piece.

The individual strands retain their shape...

...and, in this case, appear to be the crayon markings of a small child! :)

From a pair of discarded jeans, tucked away in the attic...

...I fashioned a long, denim strap.

After attaching it to the bag, however, I found it to be a bit too long...

...so I cut it in the middle, removed a length, and easily reconnected it.

To maintain a clean exterior, I used magnet closures again this time...

...covering them in a bit of flower-print fabric for ease in attaching.

Posted by Picasa

Wednesday, May 16, 2012

Pencil Roving Purse- Part 1 of 2

Cutting lengths of pencil roving...

 
...in various colors.

 
As an accompaniment, fluffy orange wool with colored cotton dots. :)

 
Laying out a design on the resist...

...allowing some of the ends to wrap around to side two...


...and covering it with a layer of speckled roving. 
 
The piece after one layer of wool on each side...

 
...and, again, after several, mid-felting...

...(you'll notice that I'm working 'inside-out' again.)

 
Cutting open the partially felted piece and removing the resist.


In a comment on a recent post...

...my friend, Terriea wondered about pencil roving, and it got me thinking.

For those of you who don't already know...

...pencil roving is a very soft, un-spun, carded fiber that has been drawn until it is the size of a fat pencil.

Used by commercial yarn makers and home spinners alike...

...it can even be used 'as is' by knitters or crocheters...

...as long as they don't pull too tightly on their stitches while they work.

For felters, it can be a wonderful shortcut when a precise line is needed...

...and it works especially well for projects which require 'writing', like this!

In order to show you some more of the 'joys of pencil roving'...

...I decided to feature this interesting fiber product on a small bag.

I took various colors of pencil roving...

...cutting lengths of each color in turn.

After placing them on the resist in my desired pattern...

...I covered them with layers of orange dotted roving.

Next time: the finished purse...

...including a re-purposed denim handle.

Posted by Picasa