Monday, February 11, 2013

'Video-Inspired' Felt Hat- Attempt 1 of 2

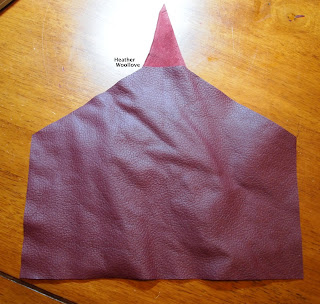
Cutting out 'house-shaped' pieces of finished felt...

 
...and long strips of felt in a complimentary color.


Sewing the strips to the pentagons to form sets...
 
...and joining the sets to form a whole.


Cutting strips of felt for a hat band... 
 
...and stitching it into place.

 
The finished hat...

 
...and in situ! :)

 
I have a dear friend who was looking for a very specific kind of hat for her husband at Christmas-time...

...and after 'coming up short' at her usual shopping haunts, she enlisted my help.

Now, those of you who know me, know that I am no hat-maker...

...but I decided to consider it a challenge! :)

This was her request:

"Make a hat like the one in this video." (!)

After pulling out a stack of felting books and looking through all of the different styles...

...I chose to try a version of Chad Alice Hagen's "The Marvelous Mitre"...

...from her peerless Fabulous Felt Hats book.

It seemed to have the same squared-off look at the top as the one in the video..

...and because I had leftover felt from this project that I could use...

...I figured, 'nothing ventured, nothing gained'! :)

Next time: I make a wet-felted stab at it.

Posted by Picasa

Saturday, February 9, 2013

Mixed Raw Fleece Winter Slippers- Part 2 of 2

The finished slippers...

 
...shown, first, with the wrong side out...

 
...then here, as they are meant to be worn.

 
A close-up of their nubby texture.

 
Notice the boingy little fleece appendages on the heels?

 
In my daydreams, they transform these lowly, earthbound slippers...

...into winged sandals, like those belonging to the Greek god, Hermes! Giggle.
 
With a dense layer of raw fleece and cushiony layers of roving...


...these slippers will keep my partner's toes toasty warm.

 
Working with raw fleece is always fun for me...

...and getting to use up a portion of my mixed 'bag 'o locks' was a good feeling, as well!

Because of the rust, black and cream roving that I used to wrap around the edges of the resist...

...the toes of the finished slippers have a rather calico cat look to them...

...while the rest of the slippers remind me of a pinto horse or a Dalmatian.

At first, my partner flirted with the idea of wearing them 'inside-out'...

...but the charm of the raw locks exterior won him over in the end.

After all, who could resist having wings at their heels? :)

Posted by Picasa

Thursday, February 7, 2013

Mixed Raw Fleece Winter Slippers- Part 1 of 2

Laying out lovely, spongy roving from Hog Island Sheep...

...for the footbeds and slipper tops.

 
Adding a thick layer of raw locks...

 
...followed by dyed merino roving.


Wetting out the piece. 
 
Adding several layers of 'oddball' roving in various colors...

 
...left over from earlier projects.

 
The felting commences.

 
Cutting the slippers apart, mid-way through felting.

 
The slippers that my partner felted for himself last year have already worn through...

...so I decided that it was time to make him a warmer and sturdier pair.

"And what could be toastier", thought I...

..."than a pair made with a thick layer of raw fleece?" Grin.

Using raw locks and roving left over from other projects...

...I laid out a soft and cushiony layer of Hog Island roving for the soles of the slippers...

...and the slipper openings.

Next, I added a thick layer of raw fleece to the resist...

...and covered it with layers of wool roving in various colors.

Next time: the finished slippers...

...with their 'Hermes-like' boingy bits! :)

Posted by Picasa

Tuesday, February 5, 2013

"Manly" Storage Envelopes- Part 2 of 2

The white envelope back side...


...and flap side (prior to adding the button).

 
The commercial felt pieces really 'stick out' from the envelope surface...

...providing an interesting texture.

 
Flap open (note the buttonhole reinforcement)... 
 
...and closed...


...with leather button.

The second envelope (flap side).

 
 After top-stitching...

...I trimmed the felt along the seam for a tidy look.
 
Always in a quandry about what to make for my male co-workers...

....I decided to create some sort of storage envelope for two of them this Christmas.

(Because even in a world of computerized records...

...there are still some important papers that a person needs to retain.)

Since it was my first time, working with commercial wool felt...

...it was interesting to see that the pieces merely felted 'to' and not really 'into' the finished felt...

...resulting in a highly textured surface.

To add to their masculine look, I cut and stitched a leather flap for each one...

...and used braided leather buttons for the closures.

Posted by Picasa

Sunday, February 3, 2013

"Manly" Storage Envelopes- Part 1 of 2

Laying out roughly-cut, 100% wool, commercial felt pieces...

 
...and covering them with two different colors of wool roving...

...for two separate envelopes.

 
Adding additional layers of roving...


...to both sides of the resist.

(I'm working inside-out, of course!) :)
 
The fully felted 'halves' (front)...


...and back.

 
Trimming a piece of burgundy leather to size...

...and reinforcing the 'buttonhole' area.

 
Attaching the top-stitched leather flap to the first felted envelope.

 
Some time ago...

...I was given several sheets of 100% wool, commercial felt.

Looking for a fun way to use them...

...I devised these felted envelopes for Christmas gift-giving.

After 'roughing up' the back of the felt sheets...

...I cut them into small rectangles and covered them with wool roving.

You may have noticed that I 'lost' a few pieces during the felting process...

...but, as I wasn't going for a precise look, it didn't bother me.

Once I knew the finished size of each envelope...

...I trimmed a leather flap for each one...

...reinforcing the buttonhole section with a second layer of leather...

...and top-stitching around the edges with variegated thread.

Next time: the finished envelopes...

...with woven leather buttons.

Posted by Picasa

Friday, February 1, 2013

"Woven Lattice" Pre-Felt Infinity Scarf

Laying out mauve merino roving for a pre-felt.


Cutting strips of green and mauve pre-felt to size. 


"Weaving" strips to form a lattice...

..."over-under, over-under"...like in Girl Scouts! :)
 
Wetting out the project...

 
...and gently felting it...

 
...and fulling it.

 
The finished scarf (here, as 'picket fence')...
 
...and opened up.

 
My middle daughter picked this color combination...

...when I was beginning a Christmas gift for a dear family friend.

Using strips of pre-felt and no stitching with nylon thread this time...

...I 'wove' a lattice, and carefully felted it into one continuous loop.

It's large enough that it can be twisted and pulled over the head a second time...

...or allowed to hang long and loose for a cowl.

Posted by Picasa