Showing posts with label leather buttons. Show all posts

Saturday, March 8, 2014

'After Klimt' Nuno Felted Jacket- Part 4 of 4

 Detail of pre-felt shapes over hand-dyed silk.


A circle of finished felt (inside) reinforces the button.


French seams were used for a finished look.


                                                     More pre-felt details...and glorious ruching!


                                                           The front panels of the jacket...


                                                             ...and more close-ups...


                                                             ...of silk and pre-felt bits.


                                                          Aren't the colors spectacular?!?                                       


Here I am, modeling the jacket at Felter's Rendezvous...

...all set for our felt fashion show!


Thursday, March 6, 2014

'After Klimt' Nuno Felted Jacket- Part 3 of 4


                                             The front of the jacket, all cut out and ready to sew...


                                                                    ...and the back.
     

                                                   Pinning the side seam, prior to sewing.


A detail of the jacket front.


The back of the completed jacket...


                                                             ...and a sleeve detail.


                                       The jacket interior (French seams were sewn throughout).


                                                                    The jacket front...


                                                 ...and again, here, in all of its riotous color!


                                                  Next time: more detail and close-up photos.


Tuesday, February 5, 2013

"Manly" Storage Envelopes- Part 2 of 2

The white envelope back side...


...and flap side (prior to adding the button).

 
The commercial felt pieces really 'stick out' from the envelope surface...

...providing an interesting texture.

 
Flap open (note the buttonhole reinforcement)... 
 
...and closed...


...with leather button.

The second envelope (flap side).

 
 After top-stitching...

...I trimmed the felt along the seam for a tidy look.
 
Always in a quandry about what to make for my male co-workers...

....I decided to create some sort of storage envelope for two of them this Christmas.

(Because even in a world of computerized records...

...there are still some important papers that a person needs to retain.)

Since it was my first time, working with commercial wool felt...

...it was interesting to see that the pieces merely felted 'to' and not really 'into' the finished felt...

...resulting in a highly textured surface.

To add to their masculine look, I cut and stitched a leather flap for each one...

...and used braided leather buttons for the closures.

Posted by Picasa

Sunday, February 3, 2013

"Manly" Storage Envelopes- Part 1 of 2

Laying out roughly-cut, 100% wool, commercial felt pieces...

 
...and covering them with two different colors of wool roving...

...for two separate envelopes.

 
Adding additional layers of roving...


...to both sides of the resist.

(I'm working inside-out, of course!) :)
 
The fully felted 'halves' (front)...


...and back.

 
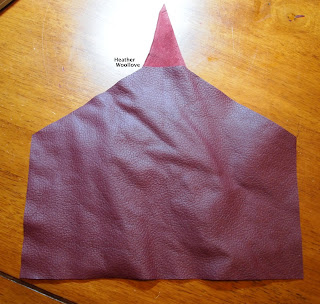
Trimming a piece of burgundy leather to size...

...and reinforcing the 'buttonhole' area.

 
Attaching the top-stitched leather flap to the first felted envelope.

 
Some time ago...

...I was given several sheets of 100% wool, commercial felt.

Looking for a fun way to use them...

...I devised these felted envelopes for Christmas gift-giving.

After 'roughing up' the back of the felt sheets...

...I cut them into small rectangles and covered them with wool roving.

You may have noticed that I 'lost' a few pieces during the felting process...

...but, as I wasn't going for a precise look, it didn't bother me.

Once I knew the finished size of each envelope...

...I trimmed a leather flap for each one...

...reinforcing the buttonhole section with a second layer of leather...

...and top-stitching around the edges with variegated thread.

Next time: the finished envelopes...

...with woven leather buttons.

Posted by Picasa

Friday, August 10, 2012

"Ribbon Yarn" Journal Cover- Part 2 of 2

The finished cover...

 
...and now with hand-dyed leather closure.

 
You'll notice that I reinforced the buttonhole area with a second layer of leather.

 
Adding a thick leather button finishes it off.


This is the kind of easily-acquired Composition Book that I like to put 'inside'. 
 
Now, private papers can't fall out and get lost.

 
The finished cover in all of its glory (front side)...

 
...and back.

 
Some months ago, when I first dyed this deer hide for a particular project...

...I wasn't sure that I'd ever find another use for pink leather!

Funny, isn't it, how it keeps finding utility in different projects?...

...like when you buy shoes in an odd color and then realize that they go with absolutely everything! :)

Because I wanted to reinforce the area that would see the most use (the buttonhole)...

...I stitched two layers of leather together to form that part of the closure.

While looking through my button bin for the perfect, colorful button...

...I found a thick, green, handmade, leather one from a felting friend in Chile.

Voila...a match made in heaven!!

Posted by Picasa

Thursday, December 29, 2011

Faux Two-Layer Scarf: Redux


Laying out grey wool roving.


Covering the wetted-out roving with a frame of thin plastic foam.


Adding layers of brown merino roving.


After wetting out the piece and folding in the edges.


A view from the back...before felting.


The finished scarf...


...again, with a top layer that only appears to be separate from the bottom...


...and this time, with leather 'buttons' instead of metal washers.


Because using a bubble wrap 'frame' last time ended up being a bit 'fiddly'...

...I decided to try felting one into the piece...

...and then cutting it out after the scarf was partially felted.

I sandwiched a wide foam frame between the two colors of roving...

...then felted the scarf until it passed the pinch test.

Next, I cut along the outer edge of the scarf...

...removed the foam frame, and finished the piece.

When the scarf was fully felted and dry...

...I trimmed the top layer so that the bottom layer would show.

I cut squares of grey leather for the 'attachments' this time...

...and machine-stitched them to each corner of the scarf.

Overall, I found it a bit easier to use this method...

...but I think I prefer the more organic edge of the top layer from my first try.

Next time: a very purple purse! :)

Posted by Picasa