Showing posts with label dreads. Show all posts

Saturday, February 8, 2014

Felting Retreat With Arrowmont Friends- Part 2 of 2

Some of our felt experiments.


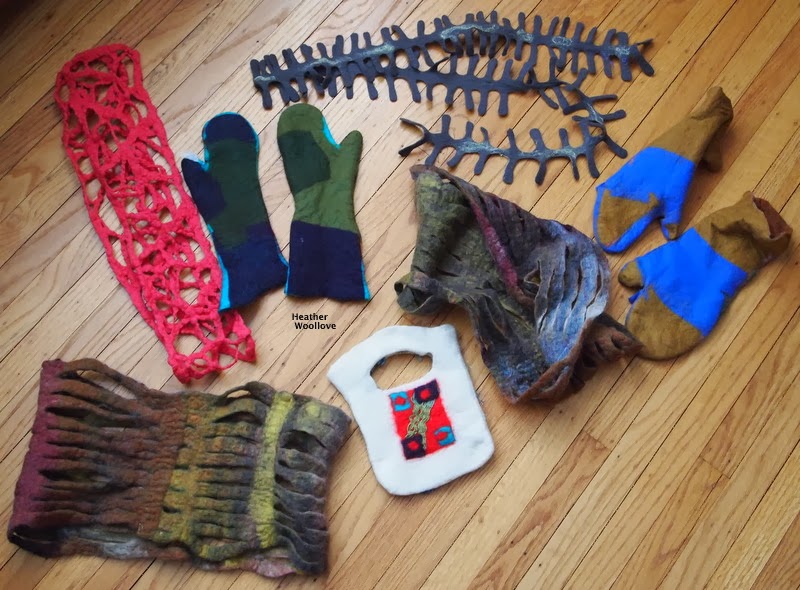
                                            Lattice scarves, infinity scarves made with pre-felt...

                                               ...centipede scarves, mittens and detritus totes.


                                                     I think that my vegetarian meals...

                                      ...were a bit of a surprise (at first) for my omnivore friends! :)


                                         We experimented with lots of fun techniques and fabrics...


                                            ...open-weave linen and wildly patterned silk chiffon!


                                               Kiki and Lorin's finished pre-felt and fabric totes...


                                                                 ...are really wonderful!


                                                What a terrific week of felting and friendship!

                                                            (I can't wait for next year!!)


Saturday, August 10, 2013

"Wiggly Dreads" Bowl- Part 2 of 2

Mid-way through felting...

 
...lengths of roving are threaded through the bowl edge, making 'dreads'.

(Pliers are used to help to pull the thick, slippery needle through the wet felt.)

 
The piece is gathered into a bowl-like shape...

...by hand-basting with strong nylon thread...

...and then the final felting and fulling takes place.

 
The finished bowl.

 
A close-up of the felted-in wool nepps and dyed tussah silk.

 
The rather 'sedate' bowl bottom. :)

 
The finished bowl...

...with nylon basting stitches removed.

 
With this project...

...I took advantage to the propensity of felt...

...to hold a 'shape memory' once dry.

Basting the piece prior to final felting and drying...

...allowed me to remove the nylon thread...

...while retaining the desired shape.

Posted by Picasa

Wednesday, August 7, 2013

"Wiggly Dreads" Bowl- Part 1 of 2

Laying out dyed wool nepps and tussah silk circles...

 
...in the warm company of our instructor, Nicola and my other lovely classmates.

 
Adding design elements to side two...

 
...and covering them with layers of bright roving.

 
Since this was an 'open resist' project...

...the wool rays were folded in during the layout...

...to create a finished looking open edge.

 
Covering the entire piece with dark grey roving.

 
Mid-way through felting...

 
...orange 'dreads' are added.

 
My intention was to create a wide, cylindrical bowl...

...using the 'open-resist' method.

Unfortunately, either the lay-out or the felting went a bit awry...

...and at the mid-way point, it was more of a pancake than any kind of bowl!

Next time: how a little judicious stitching with strong thread (thanks, Nicola!)...

...rescues the project from utter failure.

Posted by Picasa

Saturday, December 1, 2012

It's A Baby Boom! Wet-Felted Play Mats- Part 5 of 5

My three completed baby gifts.

 
A close-up of one of the cones...

...telescoped down.

 
Mat one with the cones flattened...

 
...and popped up for play.

 
Mat two with the cones down...

 
...and up...

...doesn't the purple one look like an elephant's trunk?

 
Mat three with its single cone down...

 
...and up.

 
As you can see...

...each of the play mats has convertible 'appendages'...

...for a baby to manipulate or hold onto.

The tubes can be pushed through to the back...

...or craftily 'peered through' for fun.

Since the cones were dried in the collapsed position...

...they easily fold back down when you want them flat again.

Posted by Picasa

Thursday, November 29, 2012

It's A Baby Boom! Wet-Felted Play Mats- Part 4 of 5

Carefully trimming holes in the felt behind the 'extensions'.

 
Notice the nylon stitches, holding the pre-felt tube or cone in place.

 
Never fear...the knots in the yarn that I placed at the project back...

 
...will be trimmed a bit shorter after felting.


Adding plastic and foam resists within the 'extensions'... 
 
...to keep them from felting together, flat...

...or felting into the white mat.


The piece begins to shrink and thicken during felting...
 
...and now the fulling begins!

(Looks a bit like a jellyfish, here, doesn't it?) :)

 
After stitching the cones and tubes to the mat surface...

...I trimmed circles of felt from the project back.

To keep the 'extensions' patent during the final felting...

...I filled each hole with pieces of thin plastic or foam.

Next time: the finished play mats...

...in all of their convertible glory! :)

Posted by Picasa

Tuesday, November 27, 2012

It's A Baby Boom! Wet-Felted Play Mats- Part 3 of 5

Using foam resists to make cylindrical...

 
...and cone-shaped pre-felts in bright colors.

 
Centering each pre-felt shape within a 'yarn circle'...


...and stitching them to the mat with nylon thread...
 
...for a 3-D effect.

 
Play mat number two with 'extensions' in different colors.

 
A view of the mats from the top...

 
...and from the side.

 
Using wool roving in bright colors...

...I fashioned various pre-felt shapes using foam resists.

I hand-stitched these 'extensions'...

...to the center of each 'yarn-defined' circle or diamond...

...with sturdy nylon thread.

Next time: I prepare the mats for final felting.

Posted by Picasa