Showing posts with label book cover. Show all posts

Friday, June 5, 2015

Pre-Felt 'Confetti' Book Cover- Part 2 of 2

Choosing a piece of colored leather for the closure.


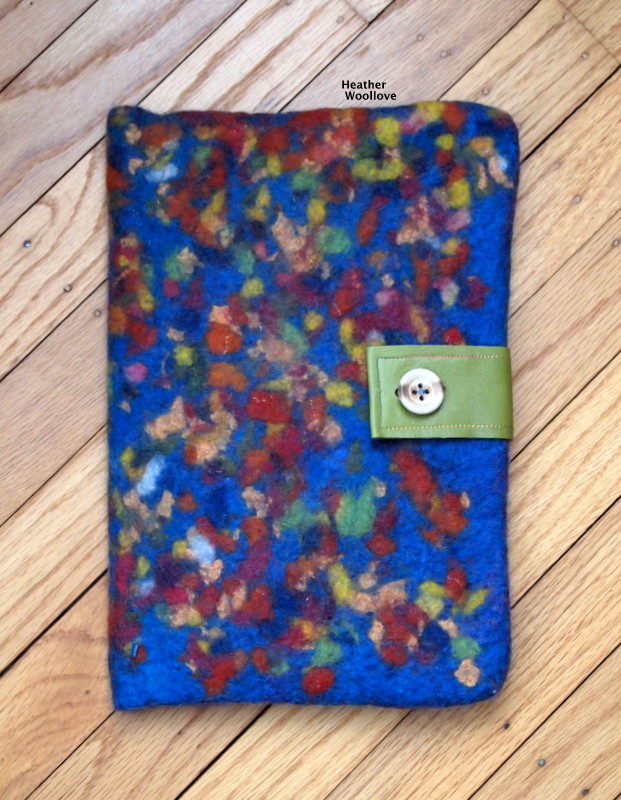
                                                The finished book cover (folded)...


                                                          ...and opened up.


                                     Trimming an opening for the book's insertion.


                            Sewing on a leather closure (front side with button hole)...


                                                            ...and back side.


                                                Adding a natural wooden button.


                              The finished book cover (with blank journal inside).


Wednesday, June 3, 2015

Pre-Felt 'Confetti' Book Cover- Part 1 of 2

Cutting colored pre-felt pieces into 'confetti'...


                                ...and sprinkling them onto the surface of the resist.


                          Covering both sides of the resist with wool roving from a batt...


                                   ...and remembering to use a bit of orange wool...

                                 ...to mark the side with the pre-felt embellishments.


                                                      Mid-way through felting.


                                                       Removing the resist...

                                   ...and turning the project right-side out for fulling.


                             Next time: I choose colored leather for the fastener...

                                                 ...and finish the book cover.

Monday, February 14, 2011

Happy Valentine's Day!

Journal cover layout with silk sari waste and a white crocheted heart.


Close-up of bead embellishment.


Notice how the red dye from the silk waste turned the cotton heart pink?


The reverse side with an opening cut out for the composition book.


I made this journal cover for my daughters 'budget book'...

...figuring that pretty supplies always make onerous jobs a bit more fun! :)

I laid out silk waste from sari making...

...and a hand-crocheted, cotton heart that I found in our church thrift store.

I covered the whole shebang with white roving...

...and finished felting it.

Remember that if you work inside-out like this, you can get confused...

...so don't forget to felt a dot of color on the last layout layer of the 'cut me' side!

I embellished the heart with multi-colored glass beads when it was done...

...both for extra sparkle, and also to hold down a couple of not-quite-felted-in spots on the doily heart.

Posted by Picasa

Wednesday, September 8, 2010

Art Deco Book Cover For A Swap


Posted by Picasa


I'm participating in another seasonal swap...

...and this one was right up my alley!!

It involved making a book cover for my swap partner...

...plus one additional small gift.

Since I was making it as a cover for a journal, instead of a hardback book...

...I fiddled with the size of the resist a bit.

It turns out that I could have left the one I had been using quite alone...

...and I think the fit might have been a little closer.

(This is not a perfect science for me, as yet!!)

I began with dark grey pencil roving...

...and fashioned my design by embedding it in soap glue that I had rubbed onto the resist.

I added yellow roving and some flax and tussah silk bits...

...and covered the whole with orange wool batts.

As with my previous several bookcovers, I felted it inside-out as a closed resist...

...then cut an opening for the book after the cover was dry.

It's important to think hard about design placement with this method...

...I actually had to draw it out on paper and 'try it', first!!

Otherwise, you can end up with the design on the backside of the journal...

...or even upside-down!

And don't forget to make an obvious dot of a foreign color on the inside cover in your final layer of wool...

...or else, you could easily get confused during the felting process and end up cutting into the design side by mistake!


Posted by Picasa

Friday, August 27, 2010

"Create" Journal Cover: Part 2


Because I intended this cover for use with a standard composition notebook, rather than a hardback book...

...I had made the resist somewhat wider this time.

Big mistake!!

It turns out that a very slightly wider resist would have been plenty...

...and I had to get out the rotary cutter and perform some surgery!

After cutting and removing the 'offending extra felt'...

...I sewed the cover back together (using my sewing machine).

You really don't notice the seam all that much...

...since it's right on the journal's spine.

Because of the unfortunate cotton layout and rescue...

...some areas of the cover were too thin, and I had to hand-sew felt patches to some of them for reinforcement.

Suffice it to say that no one is going to see the inside of this cover but me...

...since from the outside, it doesn't look half bad! Grin.


Posted by Picasa

Wednesday, August 25, 2010

"Create" Journal Cover: Part 1


Covering my circles with COTTON sliver!! (Ooops!!)


Needle-felted pencil roving "create" on a bit of wool roving.


Fully laid out COTTON sliver...right before I realized what I had done. Yeesh!!


"Say what???!?!?" After all that fiddling around, it's too big??!??
***********************************************************

Still in my creative fog, I laid out my latest book cover (a journal cover this time!)...

...and discovered (after I thought to myself, "Hmmmm, this wool roving feels really soft and different...I wonder what kind it is?!?!?")...

...that I had laid out the entire back side with organic cotton combed sliver!!!

Now, small amounts of cotton will felt into wool, of course...

...but an entire clot of cotton would only turn into a soggy mess if you tried to felt it!!!

Luckily, I read the label in time and was able to carefully remove the cotton layer and replace it with wool roving.

(I did leave some small cotton wisps around the word "create" and I think they felted in to good effect.)

So that I didn't have to lay out my cursive pencil roving word both upside-down and in reverse ...

...I needle-felted it into a thin batt of roving first.

Unfortunately, when I tried the finished cover on the journal that it was intended for...

...I discovered that I had made it too large! Sighhhh.

Next time: the remedy!


Posted by Picasa

Wednesday, August 11, 2010

Goddess Hand Book Cover


You'll have to bear with me for a little while...

...since the process photos from my last several projects were lost in the miasma of cyberland, never to be seen again.

It serves me right for not taking the time to back things up...

...but I'm happy to report that my operating system has been re-installed and I hope to be a bit more compliant going forward! Grin.

I've made a couple of additions to this book cover since last you've seen it...

...a bit of hand embroidery (har...I just love a cheap joke!)...

...and a few colored beads sewn on, too.

Since it's for a birthday gift, I've sewn my friend's initials into the front flap as well...

...so people know who to return it to (she is an inveterate book lender!)


Posted by Picasa

Saturday, August 7, 2010

More Bookcovers (Best Laid Plans)


Well, the photos that I intended to show you...

...are being held hostage by my recalcitrant computer.

It must have a virus, because I can't log on...

...and must wait for someone who is 'in the know' to help me.

In the meantime, I've borrowed my daughter's new tablet PC...

...and I've taken some new photos (of my finished covers) for you.

I promise that the process photos will be posted as soon as I can manage it...

...but for today, I'll skip to the end (again).

The green book cover was made with bits of sari silk...

...pieces of a sheer synthetic scarf, and bright green roving.

For the Goddess hand book cover...

...I cut a multi-colored piece of pre-felt into a hand shape, and needle-felted a pencil roving swirl onto it.

Because I used a closed resist, and wanted you to see how the cut was made (to make way for the book)...

...I've shown you the 'back side' of the burnt orange one.

You'll notice that I left a small 'lip' along the center of the cover...

...for better coverage along the spine.
Posted by Picasa

Wednesday, August 4, 2010

Yellow Embellished Bookcover


This is the first bookcover that I've ever tried...

...and to make it, I followed the Journal Cover directions in Uniquely Felt.

I had hoped that the silk petals and other silk bits...

...would felt into the wool but still really show.

Unfortunately, I used roving that was too dark...

...and the designs were nearly obliterated.

To the rescue?...

...embroidery!

I stitched around each flower and along the yellow edging on the front cover...

...adding beads to a couple of the flowers as centers.

Because I struggled a bit with the partial resist...

...there is a little bit of book showing along the top and bottom of the spine.

(You can see this more clearly in the previous post.)

Getting silk pieces 'veiled' enough to 'felt in', but not disappear entirely...

...is a technique that I still need some practice (HELP!) with. :)

The cover fits a standard hardback book perfectly, though...

...and since I only ever embellish under duress, maybe it wasn't such a bad thing after all!?!?!?

Posted by Picasa