Monday, August 12, 2013

Happiness is a Bridal Shower! :)

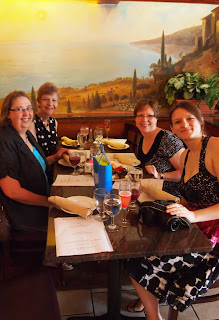
The shower venue...

...a local Italian restaurant.

 
The bride to be (right) with her Maid of Honor (left).


Dear friends from far and wide attended.
 
Festive gift bags were prepared...

...filled with hand-made Italian cookies.

 
I was one happy Mama!

 
Hopes and dreams and stories were shared...

...and smiles were plentiful.


My four wonderful daughters.

(Oh, how I love them all!!!)
 
Fruity red wine and Bellinis were enjoyed...

 
...and there was (of course!) a silly hat. :)

 
Apologies to all of my fiber-loving friends...

...but bridal shower preparations took precedence over feltmaking for me last week! :)

My eldest daughter is getting married in a couple of months (woo-hoo!)...

...and we celebrated her bridal shower this past Saturday.

Excepting two girlfriends who live far away...

...everyone I love most in my life was here with us...

...and it made for a grand celebration!!

Thanks to loving friends near and far...

...(my 'logical' family)...

...you mean the world to me!

Posted by Picasa

Saturday, August 10, 2013

"Wiggly Dreads" Bowl- Part 2 of 2

Mid-way through felting...

 
...lengths of roving are threaded through the bowl edge, making 'dreads'.

(Pliers are used to help to pull the thick, slippery needle through the wet felt.)

 
The piece is gathered into a bowl-like shape...

...by hand-basting with strong nylon thread...

...and then the final felting and fulling takes place.

 
The finished bowl.

 
A close-up of the felted-in wool nepps and dyed tussah silk.

 
The rather 'sedate' bowl bottom. :)

 
The finished bowl...

...with nylon basting stitches removed.

 
With this project...

...I took advantage to the propensity of felt...

...to hold a 'shape memory' once dry.

Basting the piece prior to final felting and drying...

...allowed me to remove the nylon thread...

...while retaining the desired shape.

Posted by Picasa

Wednesday, August 7, 2013

"Wiggly Dreads" Bowl- Part 1 of 2

Laying out dyed wool nepps and tussah silk circles...

 
...in the warm company of our instructor, Nicola and my other lovely classmates.

 
Adding design elements to side two...

 
...and covering them with layers of bright roving.

 
Since this was an 'open resist' project...

...the wool rays were folded in during the layout...

...to create a finished looking open edge.

 
Covering the entire piece with dark grey roving.

 
Mid-way through felting...

 
...orange 'dreads' are added.

 
My intention was to create a wide, cylindrical bowl...

...using the 'open-resist' method.

Unfortunately, either the lay-out or the felting went a bit awry...

...and at the mid-way point, it was more of a pancake than any kind of bowl!

Next time: how a little judicious stitching with strong thread (thanks, Nicola!)...

...rescues the project from utter failure.

Posted by Picasa

Monday, August 5, 2013

Nuno Felted Beret Using Plant-Dyed Silk

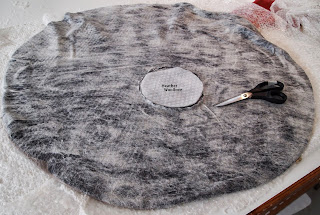
Covering a large bubble wrap resist with wool roving...

...in concentric circles...

 
...light grey over dark.


Wetting out the project... 
 
...then adding a layer of plant-dyed silk gauze to the top surface.

 
Cutting a 'head hole' mid-felting.

(You can see just how oversized this resist really is!)

 
Felting and fulling the hat.

 
The finished beret with darker grey interior...


...and highly rugated outer surface.
 
Working from a concept taught by Judit Pocs...

...that several of my classmates had tried at Feltfull...

...I recently attempted to make a large, soft beret...

...using more of that plant-dyed silk gauze that I wasn't exactly thrilled with.

Result? The felt is very soft...

...and boy, is it ever large!!

(Obviously, I need to re-engineer the template prior to my next attempt!) :)

In order to salvage this project...

...I arranged the wet felt into the folds and ridges that you see...

...basting them in place to dry.

Lessons learned?

1) If I don't pay attention to all of the particulars of a project...

...I will invariably need to make more than one of them in order to 'get it'.

2) I learn more from my failures than I do from projects that actually work! 

Posted by Picasa

Saturday, August 3, 2013

'Flirty' Two Layer Plant-Dyed Shawl

Adding black wool roving to the edges of a plant-dyed piece of silk gauze...


...then covering the 'whole shebang' with a layer of black silk gauze... 
 
...and in the process, 'sandwiching in' a collar of roving...

...embellished with small squares of white pre-felt.

 
The finished shawl with collar and ruffled top edge.

 
A view from the back.


(The prints from the plant dyeing are a bit more visible here.)

  
The finished shawl...

 
...'on location' in Spain! :)

 
While playing around, mid-week in Portugal...

...I decided to try a technique similar to one that Claudia Burkhardt had demonstrated for us at Feltfull.

I sandwiched a border of black roving and small, white, pre-felt squares...

...between a one layer of black...

...and one layer of white silk gauze that I had plant dyed (but didn't much like).

Because the edges of the silk were not hemmed...

...I 'trapped' the silk along the top edge of the shawl with wool...

...resulting in a soft, narrow ruffle.

The finished scarf falls as two loose layers of un-hemmed silk...

...connected by its embellished wool collar.

Posted by Picasa

Thursday, August 1, 2013

Raw Fleece Purse With Leather Strap- Part 2 of 2

The back side of the finished purse...

 
...and a close-up.

 
The purse front...

 
...with leather buttonhole and vintage button.


To fashion the strap, I cut a long strip of thick black leather...

...and stitched it in half, 'suede side out'...

 
...then sewed it to the felt.
 
The finished purse.

 
Posted by Picasa