Showing posts with label drum carder. Show all posts

Wednesday, December 5, 2012

"Snowperson" Bag Swap Gift- Part 2 of 2

The finished bag.

 
Drawstring cord made with grosgrain ribbon and leather.

 
A 'regal' profile. ;)

 
A view from the front.

 
The carded Border Leicester locks...

...give the bag a delightfully shimmery and bumpy texture...

 
...just like a 'real' snowball!

 
The drawstring can be tightened...

 
...or loosened for easy access to the bag's contents.

 
The idea behind using batts made from carded locks...

...was to create a textural felt that would mimic the rough surface of a snowman.

Working with such unexpectedly filthy locks, however...

...made me worry that the finished bag would have the 'dirty slush' look of a real snowman, as well...

...and that's a bit too much verisimilitude for my taste!!

Happily, as I continued to felt the project (using extra soap)...

...the bag became as white as...erm...the driven snow. :)

For the bag closure, I fashioned a 'bolo tie' sort of cincture...

...from grosgrain ribbon and small pieces of leather.

Posted by Picasa

Monday, December 3, 2012

"Snowperson" Bag Swap Gift- Part 1 of 2

Laying out wool roving eyes and a carrot nose...

 
...then adding more bits of coal black for a smile.

 
From washed Border Leicester locks...

 
...I made several fluffy batts on my drum carder...

...and laid them over the 'face' side of the resist.


Looking through the resist from side two...

...allows me to check my design placement.
 
Covering all but the top portion of the resist with batts...

...(allowing for a more free-form top edge)...

...and adding a cloth strip for a 'drawstring channel reinforcement'.

 
The partially felted bag...

 
...now with its carrot nose in proper alignment. :)

 
I signed up to participate in a holiday swap this year...

...and, not knowing for certain 'which major holiday' the recipient observed...

...I decided to make a felt 'snowperson' bag as my gift.

Using raw Border Leicester locks...

...(which were not quite as 'washed' as advertised)...

...I carded up some shiny, fluffy batts.

Making a 'face' with black and orange wool roving...

...I proceeded to make an open-topped bag...

...with a drawstring channel for its closure.

Next time: the finished bag...

...with leather-trimmed ribbon cincture.

Posted by Picasa

Wednesday, November 9, 2011

Two Projects From Art Batts- Part 1 of 4


Blending different fibers for art batts.

Shimmery sari silk waste.

Some finished batts...

...with big chunks of color...

...and in all different colourways!

Laying out project # 1: a peanut-shaped resist bag.


I have a lot of oddball fibers in my stash...

...and in late summer, I thought it would be fun to utilize my drum carder...

...and make some sassy mixed-fiber batts!

I blended bits of wool and mohair, tussah silk, alpaca...

...variegated pencil roving, sari silk waste and cotton sliver...

...into these interestingly-textured batts.

The first project is a (ho-hum...the 'usual') peanut-shaped resist bag...

...but after I had felted this one, my middle daughter took it away for embellishing...

...and wait until you see how cute it is!! :)

Next time: the finished bag...

...plus a sneak peek at project # 2!!

Posted by Picasa

Monday, September 27, 2010

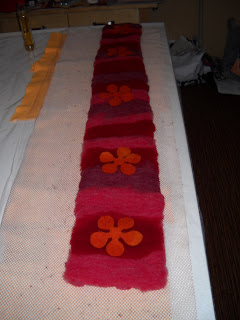
Flower Power Scarf-Part One


I have a blog friend in the Falkland Islands...

...who loves bright pink and red.

Unfortunately for her 'colour sensibility' (Grin)...

...her sub-zero work uniform is a bright orange color (for easy visibility).

When I wanted to make her a scarf as a gift...

...I decided to throw caution to the wind and combine all three of these colors!

I went with a design from the 1970's, too...

...when color combinations like this were not the exception, but de rigueur!! :)

I started by making batts on my drum carder, in three different bright pinks/reds...

...then carefully cut out flowers from orange pre-felt.

I used one set of batts lengthwise for the bottom layer...

...and topped them with overlapping sections of the three colors (in random order).

(I apologize for the darkish photographs...

...they 'come up' a little better if you double-click them.)

Next time? Part 2...

...when by-the-way...you'll see that I actually did some embroidery for a change!!! Giggle.


Posted by Picasa

Monday, May 31, 2010

Drum Carder Tutorial-Finished Batt


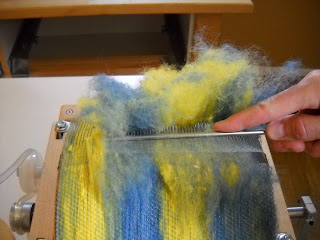
One of the nicest things about blending your own batts...

...is that you can choose just how homogeneous you want the final color to be.

I, myself, love little bright bits of different colors...

...so I stop when I can still see the elemental parts of the batt.

When you have finished using the carder...

...it's time to use the cleaning tool to clean the fiber from the teeth.

Be careful-this tool is sharp!!

It's also good to remove any fibers that have caught anywhere else on the machine...

...a vacuum and pointy-nosed pliers help with that job.

Questions? Please comment and I'll do my best to answer them.

Need More Info? There are many good video tutorials on-line.
One multi-part one that I'd recommend is by Rexenne (who is quite a unique character!)
Posted by Picasa

Drum Carder Tutorial-Splitting the Batt


At this point, I have a striped batt, which you may want, sometimes...

...but since I want to blend the two colors, I will repeat this process several more times, until I'm satisfied with the shade.

In order to do so...

...I have to split the batt into two layers.

I lay one palm on each side of the batt...

...and pinching, pull it into thin layers.

I re-feed these layers into the carder several more times, repeating the entire process...

...until I get a color I like.

Posted by Picasa

Drum Carder Tutorial-Removing the Batt-2


I wrap the free end of the batt over one end of the sushi mat...

...and start to wrap the batt around it.

The drum will turn as you remove the fiber...

...just remember to position it slightly to the left, in order to avoid the handle as you roll.

Don't roll it up all the way to the end...

...because it just makes it harder to find the end when unrolling.

As you lift the sushi mat away from the drum...

...the remaining bit of batt will come cleanly away from the carder.

Posted by Picasa

Drum Carder Tutorial-Removing the Batt-1


When I've gotten as much fiber on the carder as I need to make my batt...

...I use the doffer stick (a super strong, screwdriver-like implement) to remove it.

I place it at the flat plate of the carder drum...

...and lift up 1-inch or so at a time.

You'd be surprised how much effort it takes to pull the wool from the carder...

...that's why you do only a short stretch at a time.

Posted by Picasa