Showing posts with label bamboo viscose thrums. Show all posts

Wednesday, November 21, 2012

Asymmetrical Footed Vessel With Handles- Part 3 of 3

Fulling the vessel...

 
...and hanging it up to dry...

 
...firmly stuffed with dishtowels...

...(in order to shape it).

 
The machine-stitched 'footer'.


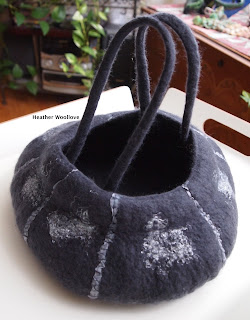
The finished vessel with clouds of bamboo viscose thrums. 
 
The opening was enlarged from the original (small) hole...

 
...by cutting on a line just inside the thickened pre-felt 'orifice'...

 
...prior to final felting and fulling.

 
In Part 2 of this project...

...I neglected to mention that I enlarged the original opening of this vessel...

...then sealed the edges (with soapy fingers) prior to final felting.

Because some of the silk selvedge 'ribbons' were a bit loose in places...

...I did a little hand-sewing, once the project was dry.

The grey-on-grey tone of the vessel really pleases me...

...and I'd like to use this combination again in the future.

I envision this vessel as a plant holder (with inner glass or plastic liner)...

...or as a 'catch-all' for odds and ends on a dresser or table top.

Posted by Picasa

Monday, November 19, 2012

Asymmetrical Footed Vessel With Handles - Part 2 of 3

Layering wool roving onto side two...

 
..and, again, covering the entire resist.

 
Making cords with dry, 'drum stick' ends for handles...

 
...affixing them to the 'mouth' of the vessel...

 
...and sheathing them in thin plastic.

 
After felting the project for some time...

...cutting a small hole in the top of the piece...


...and removing the foam resist. 
 
After further rolling, rubbing and throwing...

...this project is beginning to come together!

 
My friend's description of this vessel was instantly appealing to me...

...since it's worked from the inside...out!

I always find it fun to lay out embellishments on a foam resist...

...and then never see them again until the project is close to completion! Grin.

After attaching the dry bits of the cords to the thickened vessel orifice...

...thin plastic was used to keep the 'loose bits' of the handles from felting in.

In the past, I've used bubble wrap or a thicker plastic for this purpose...

...but I really prefer the flexibility you get with these verrry thin plastic sheets.

Repurposing hint: plastic grocery bags cut into strips work equally well!

Next time: the finished bag...

...with machine-stitched 'footer'.

Posted by Picasa

Saturday, November 17, 2012

Asymmetrical Footed Vessel With Handles-Part 1 of 3

Egg-shaped resist with dyed silk selvedge 'ribbons'.

 
Paper templates for the 'footer' and vessel 'orifice'.

 
Trimming pre-felt to the proper size and shape.

 
Laying out the 'footer'...

 
...and covering it with blue-black wool roving.

(It looks lighter in this photo than it actually is.)

 
Flipping the resist to side two.

 
Wrapping the selvedge strips to the front side...

...and adding clumps of bamboo viscose thrums.

 
Centering the pre-felt 'mouth'.

 
The process for making this vessel was described to me by a friend...

...and I decided, for my first attempt, to try it with an asymmetrical resist.

I prepared a sheet of pre-felt and cut out my 'footer' and 'orifice' shapes...

...then laid out embellishments on the resist surface.

The pre-felt bits were applied next...

...followed by layers of wool roving on both sides.

Next time: handles are fashioned...

...and the real felting begins.

Posted by Picasa

Thursday, August 30, 2012

Textured 'Neutrals' Journal Cover- Part 2 of 2

The finished cover.

 
A bit of core spun yarn and lace in close-up.

 
Shimmery, synthetic yarn adds a bit of bling to the project...

 
...and the smallest touches of orange and purple enliven a mostly beige, tan and white cover.

 
Textural excitement comes from the addition of bits of thrifted crochet, lace and neps.

 
(Badly) overdyeing a deer hide produced leather that looks a bit like burl wood.

 
Rounding out the journal cover with scissors for easier book insertion...

...and a neater look.

 
The finished cover.

 
With a busy piece like this...

...no matter where you look, there's always something new to see!

A bit of color here and there...

...rescues the cover from blandness. :)

Having rather ruined a deer hide by double-dyeing it some time ago...

...it found new utility, cut into strips and used as a bookmark!

Posted by Picasa

Tuesday, August 28, 2012

Textured 'Neutrals' Journal Cover- Part 1 of 2

Laying out a few tangles of neutral yarn remnants...

 
...and adding bits of silk, lace, and cotton gauze.

 
Tufts of camel fiber, tussah silk, flax, neps, coppery strands of Angelina...

...bamboo viscose thrums, silk noil and milk fiber all come next.


The marbled layout, as seen through the foam underlayment resist...
 
...and through the first layer of wool.

 
This dot of blue keeps the 'front' and 'back' sides straight.

 
The fully felted piece...

 
...blocked and drying.

 
Making a journal cover in 'neutrals' was a recent challenge...

...but I didn't want it to be too plain.

Looking through my bins of fabric scraps and fiber...

...I pulled out everything that I could find in neutral tones...

...and added it to the mix.

Next time: the finished piece...

...with faux burl wood bookmark.

Posted by Picasa

Sunday, December 26, 2010

Christmas Pillow Cover

Laying out wool, bamboo viscose thrums and fabric.
(Sorry for the poor photo...my camera shudders at the color red!)


The textured areas are pieces of red, synthetic fabric.


The reindeer fabric is a re-purposed thrift store find!


The finished pillow.


At Rhinebeck this Fall, I bought some wonderful, bright red roving...

...that I thought would be perfect for holiday projects.

For this pillow, I layered roving, strips of red dotted-swiss fabric (last used here)...

...and blobs of shiny bamboo viscose thrums.

Unfortunately, my camera balked at this color, so the photos aren't great...

...but since Santa brought me a new camera, things may be looking up!! :)

Posted by Picasa