Thursday, November 29, 2012

It's A Baby Boom! Wet-Felted Play Mats- Part 4 of 5

Carefully trimming holes in the felt behind the 'extensions'.

 
Notice the nylon stitches, holding the pre-felt tube or cone in place.

 
Never fear...the knots in the yarn that I placed at the project back...

 
...will be trimmed a bit shorter after felting.


Adding plastic and foam resists within the 'extensions'... 
 
...to keep them from felting together, flat...

...or felting into the white mat.


The piece begins to shrink and thicken during felting...
 
...and now the fulling begins!

(Looks a bit like a jellyfish, here, doesn't it?) :)

 
After stitching the cones and tubes to the mat surface...

...I trimmed circles of felt from the project back.

To keep the 'extensions' patent during the final felting...

...I filled each hole with pieces of thin plastic or foam.

Next time: the finished play mats...

...in all of their convertible glory! :)

Posted by Picasa

Tuesday, November 27, 2012

It's A Baby Boom! Wet-Felted Play Mats- Part 3 of 5

Using foam resists to make cylindrical...

 
...and cone-shaped pre-felts in bright colors.

 
Centering each pre-felt shape within a 'yarn circle'...


...and stitching them to the mat with nylon thread...
 
...for a 3-D effect.

 
Play mat number two with 'extensions' in different colors.

 
A view of the mats from the top...

 
...and from the side.

 
Using wool roving in bright colors...

...I fashioned various pre-felt shapes using foam resists.

I hand-stitched these 'extensions'...

...to the center of each 'yarn-defined' circle or diamond...

...with sturdy nylon thread.

Next time: I prepare the mats for final felting.

Posted by Picasa

Sunday, November 25, 2012

It's A Baby Boom! Wet-Felted Play Mats- Part 2 of 5

Stitching around the perimeter...

 
...and adding circles (and a diamond!)...

 
...with multi-colored synthetic yarn.

 
Stitching into pre-felt is a lovely thing...

..."like buttah"!

 
Here's a second one...

 
...with just circles this time.

 
I placed all of the knots at the back for a more finished look.


I love the way that this yarn magically changes color as you stitch! :)
 
Reprising the use of some variegated yarn...

...last seen in this post...

...I happily stitched away on my lovely, soft pre-felt pieces.

I outlined the perimeter of each mat...

...and added central shapes for a later (secret) purpose. :)

Next time: those secrets are revealed!

Posted by Picasa

Friday, November 23, 2012

It's A Baby Boom! Wet-Felted Play Mats- Part 1 of 5

Laying out layers of white roving in the shape of a rounded-off square.

 
Making 'dreads' using wool roving and a sushi mat...


...lots and lots of 'dreads'... 
 
...in lots of bright colors!

 
Attaching a number of 'dreads' (plus one loop) to the edges of the first white square...

 
...and to the second.

 
Wetting out the piece...

 
...and turning it into a pre-felt by partially felting it...

...and then letting it dry.

 
There must be 'something in the water' at work, lately...

...since we currently have a 'baby boomlet' going on!!

Needing three baby gifts for co-workers...

...I thought about some of the things I learned from Marjolein Dallinga in our worshop in August...

...and came up with this project.

After laying out rough squares of white roving...

...I attached colorful 'dreads' to the perimeter of each mat.

Because babies like to hold onto loops...

...(or hang things from them)...

...I included a felt loop on each play mat as well. :)

Next time: some hand-sewing...

...with synthetic yarn in bright colors.

Posted by Picasa

Wednesday, November 21, 2012

Asymmetrical Footed Vessel With Handles- Part 3 of 3

Fulling the vessel...

 
...and hanging it up to dry...

 
...firmly stuffed with dishtowels...

...(in order to shape it).

 
The machine-stitched 'footer'.


The finished vessel with clouds of bamboo viscose thrums. 
 
The opening was enlarged from the original (small) hole...
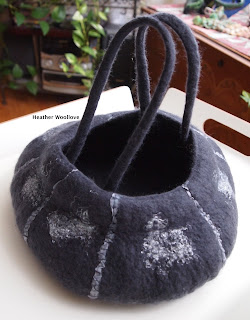
 
...by cutting on a line just inside the thickened pre-felt 'orifice'...

 
...prior to final felting and fulling.

 
In Part 2 of this project...

...I neglected to mention that I enlarged the original opening of this vessel...

...then sealed the edges (with soapy fingers) prior to final felting.

Because some of the silk selvedge 'ribbons' were a bit loose in places...

...I did a little hand-sewing, once the project was dry.

The grey-on-grey tone of the vessel really pleases me...

...and I'd like to use this combination again in the future.

I envision this vessel as a plant holder (with inner glass or plastic liner)...

...or as a 'catch-all' for odds and ends on a dresser or table top.

Posted by Picasa

Monday, November 19, 2012

Asymmetrical Footed Vessel With Handles - Part 2 of 3

Layering wool roving onto side two...

 
..and, again, covering the entire resist.

 
Making cords with dry, 'drum stick' ends for handles...

 
...affixing them to the 'mouth' of the vessel...

 
...and sheathing them in thin plastic.

 
After felting the project for some time...

...cutting a small hole in the top of the piece...


...and removing the foam resist. 
 
After further rolling, rubbing and throwing...

...this project is beginning to come together!

 
My friend's description of this vessel was instantly appealing to me...

...since it's worked from the inside...out!

I always find it fun to lay out embellishments on a foam resist...

...and then never see them again until the project is close to completion! Grin.

After attaching the dry bits of the cords to the thickened vessel orifice...

...thin plastic was used to keep the 'loose bits' of the handles from felting in.

In the past, I've used bubble wrap or a thicker plastic for this purpose...

...but I really prefer the flexibility you get with these verrry thin plastic sheets.

Repurposing hint: plastic grocery bags cut into strips work equally well!

Next time: the finished bag...

...with machine-stitched 'footer'.

Posted by Picasa