Monday, February 9, 2015

Yarn-Embellished Pre-Felt Table Toppers- Part 3 of 4

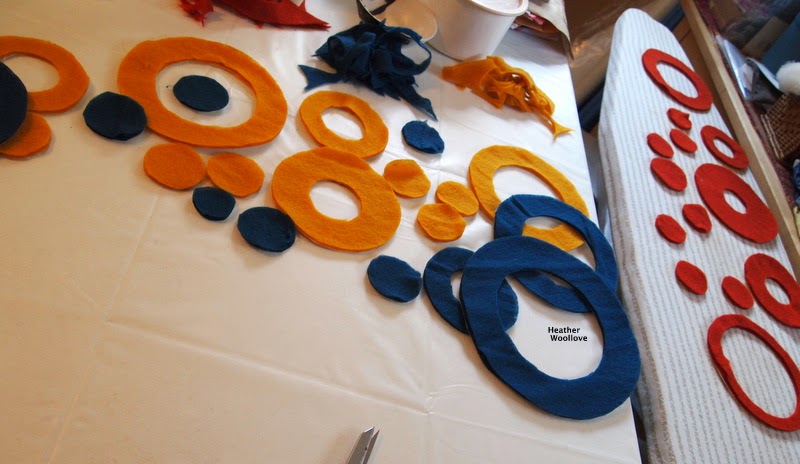
Using the same embellished, pre-felt circles...


                         ...but swapping in a bright green wool base (with cotton dots)...


                               ...a second yarn-embellished, pre-felt topper is begun!


                            A margin of base wool is left around the rings and circles...

                                        ...for an irregular, finished appearance...


               ...and, as before, the extra wool is used to reinforce the topper edges.


                                                   Mid-way through felting...


                                         ...the project is starting to come together...


                                            ...as the pre-felt rings and circles...


                                       ...are easily incorporated into the base wool.


                                                 Next time: the finished project...

                ...plus comparison photos with several of my other recent table toppers!

Saturday, February 7, 2015

Yarn-Embellished Pre-Felt Table Toppers- Part 2 of 4

After wetting it out and rubbing it for a time...

...the project is flipped over...


                                            ...and trimmed with sharp scissors...


                                                ...into its final, irregular shape.


                                          The wet, trimmed off bits of base wool...

                 ...are added to the topper perimeter for extra heft and reinforcement.


                                                            During felting...


                                               ...the pre-felt pieces and yarn...


                                               ...easily 'melt' into the base wool.


                                                       The finished topper...


                                  ...with its bright, geometric shapes and stitching...


                                           ...is sure to liven up any table top! 


Thursday, February 5, 2015

Yarn-Embellished Pre-Felt Table Toppers- Part 1 of 4

Drawing concentric circles onto a piece of freezer paper...


                       ...and ironing it onto a double layer of commercial pre-felt...

                                             ...as a vehicle for pattern transfer.


                                           Cutting out pre-felt rings and circles...


                                                        ...in primary colors.


                                                   With merino wool yarn...


                                                ...in a variegated colourway...


                                ...simple designs are hand-stitched onto each piece.


                                     Because this project was laid out 'face down'...

                                     ...this is a view of the circle backs (with knots).


                         Covering the layout with wool from a fluffy, dark brown batt.


                                                  Next time: the felting begins!

Tuesday, February 3, 2015

Silk Screened Linen Dishtowels...and a Bit of 'Make Do and Mend'

Assembling yards of red linen...

...and a silk screen that I only printed with once, years ago.

(Here's what I did with the fabric that time!)


                                        Mixing together yellow and blue fabric ink...


                                            ...to print a 'non seasonal' design...


                                                      ...in 'seasonal' colors!


                                               After drying and heat setting...

                              ...the fabric was divided into dishtowel-sized pieces...


                                             ...and hemmed for Christmas giving!


                                        *********************************************
                                    My daughter, Hannah, took an old sweater...

                                   ...(full of holes from rough machine washing)...
                                         

                                                 ...and with a felting needle...

                                                 ...and various colors of roving...


                                         ...made the sweater wearable, again!

                                              (...plus, they look like planets!) :)


                                 ***********************************************************
                               A favorite linen tunic of mine had also acquired a hole...

                            ...so I cut two circles out of black linen and hemmed them...
 

                    ...and with one circle on the inside and one on the outside of the shirt...

                                     ...I stitched them together to obscure the hole.

                                    (Spiral stitching gives it a rather quilted look!)


                                                        Next time: more circles...

                                                    ...and table toppers!

Sunday, February 1, 2015

"Woven" Silk, Yarn and Pencil-Roving Pillow- Part 2 of 2

Trimming the felt to the proper size.


                                              The back side of the finished felt.


                                      Cutting a piece of dark blue leather to match.


                               (The suede side will be visible in the finished project.)


                          Sewing the front and back sides of the pillow cover together ...       

                                                ...with the 'wrong sides' out...    
                                 

                                      ...but leaving an 'un-sewn gap' on one side.
                                         

                                               Turning the project right-side out...


                                       ...in preparation for inserting the pillow form.


                                  Punching holes in the leather side of the opening...

                                            ...and hand-stitching the gap closed.


                         The wool yarn is quite energetic-looking in the finished pillow! :)


                                                  The blue suede backside...


                                      ....and the highly textured surface of the front.


                                                        The finished pillow.

                                        (Just in time for my aunt's 75th birthday!)