Sunday, August 10, 2014

Silk Print and Selvedge Table Runner- Part 2 of 2

Mid-way through felting...
    

...the project is flipped to the fabric side...

...and work continues.


                                                   The (very plain) back side.


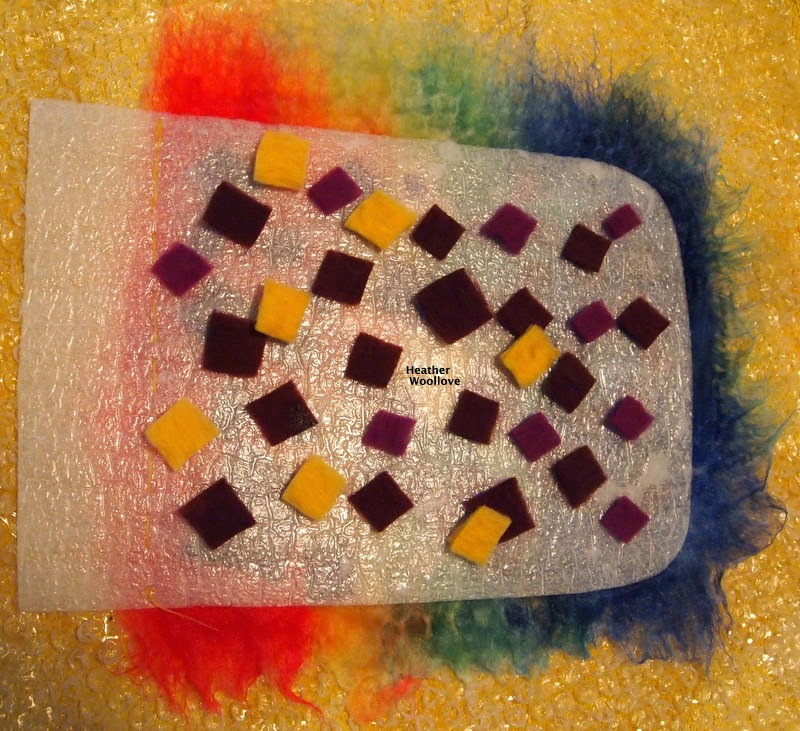
                                        Remember that all of the embellishments...


                                     ...were trapped between the silk and the wool.                                  


                         This necessitated their being either 3-D or brightly colored...


                                              ...so that they remained visible...

                                            ...(but as 'through a glass, darkly').                                     


                                                 Even the 'fabric only' sections...


                                    ...became satisfyingly textural during felting. :)


                                               The completed table runner...


                                                 ...in all of its embellished glory!


Friday, August 8, 2014

Silk Print and Selvedge Table Runner- Part 1 of 2

Laying irregular pieces of dyed silk...


                                           ...onto the bubble wrap surface...


                                           ...then adding brightly colored...


                                          ...or highly textural embellishments...

                  ...(like 'hairy' yarn, silk selvedge or finished felt cords or strips)...


                                        ...to the surface of each piece of silk.


                                                 Covering the whole shebang...


...with layers of variegated wool roving...


                                                       ...wetting it out...


                                               ...and then...lots of rubbing!


                                              Next time: the runner takes shape.

Wednesday, August 6, 2014

(Linen and Silk) Flat Felt and Leather Purse

Fashioning a paper pattern...


                           ...and cutting two side pieces from green patent leather.

                                   (Straps will be cut later from the same leather.)


                                     From this flat felt piece and a bit of leather...

                                                    ...a new purse will be born!


                                             Making a leather buttonhole...


                                              ...and positioning it for sewing.                          


                                  To reinforce the felt where the button will attach...

                                  ...I cut a small leather circle, punch holes into it... 


                                  ...and sew it inside the purse, behind the button.
                                                           

                                           The finished button and buttonhole.

                 (Thanks, again, Deborah for this wonderful handmade button!)


                                                          The purse back...


                                                          ...the open flap...


                                                     ...and the purse front.


Monday, August 4, 2014

"Fraternal Twin" Sample Totes- Part 2 of 2 (Squares)

Cutting squares of handmade pre-felt...

...and applying them to the surface of the resist.


                                            Adding a layer of wool roving...


                                          ...and flipping the project to side two.


                                                Additional roving is added...


                                        ...for a total of two layers on each side.


                                                     Mid-way through felting...


                                                ...the bag is starting to shrink...


                                                         ...and get firmer.

                                       Time to make cuts for the tote handles!


                                             Turning the project right-side out.

                               (The pre-felt squares have melted in 'like buttah'!!) :)


                                                   Side one of the finished tote...


                                                          ...and side two.


                            With this tote, I continue my 'love affair' with squares...

                                                ...my...erm..."squaffair"!?! :)

         I trimmed leftover purple and yellow pre-felt (from Part 1) into small squares...

                              ...then scattered them across the resist surface.

                                    Using variegated roving from my stash...

                         ...I then applied blocks of color over the embellishments.

                                Because this pre-felt is very softly felted...

              ...it didn't produce the sharp, crisp edges of commercial pre-felt.

                    If you desire a clearer outline with handmade pre-felt...

                                 ...be sure to felt it for a bit longer!


Saturday, August 2, 2014

"Fraternal Twin" Sample Totes- Part 1 of 2 (Landscapes)

Laying out merino roving...

...in complementary colors...


                                                      ...and wetting it out...


                                ...then rolling it 'just enough' to make 3 soft pre-felts.


                                  Overlapping layers of color in organic shapes...

                                          ...to mimic a mountain landscape.


                              Covering the pre-felt with layers of wool roving...

                             ...and adding a bright pop of color at the bag edge.


                          Overlapping horizontal strips of pre-felt to suggest rock formations.


                               Wrapping the dark wool 'rays' from side one to side two...


                         ...and covering the second side with layers of merino roving.
     

                                                  Mid-way through felting...

                                        ...the project is turned right-side out...

                                      ...curved slits are made for the handles...

                                              ...and the felting is completed.


                                                 The finished tote (front)...


                                                       ...and striated back.


                                       Using handmade pre-felts in three colors...

                      ...I endeavored to make two radically different sample totes.

                                     This first tote is rather underwhelming...

          ...since the shapes and color-blending on side one are not very appealing.

                                (I do rather like the color striations on side two, though!)

                                      Next time: using the same pre-felt colors...

                                     ...plus a different base wool and design...

                                           ...I get a startlingly new look! :)