Showing posts with label WIP. Show all posts

Saturday, September 1, 2012

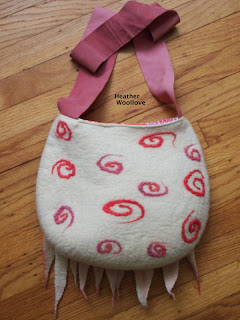
Finished WIP- Pinky-Orange 'Dreads' Purse

Cutting (and stitching together) strips of pink leather for the strap. 


  Cutting out bright fabric for the purse lining...

...and adding velcro fasteners.


                                                        Stitching the lining and strap to the finished felt.


                                 Pulling the sewn-together pieces through an opening in the bag lining.


                                                       The attached lining, prior to tucking it into the purse.


                                                                    The finished bag (wiggly side)...


                                                                                  ...and spiral side.
                                                       

                                                        The finished bag with a green felt inner pocket.


                                                                   I was very happy to finish this project...

                                                                    ...and finally put this fun bag to use!

                                                          Finding the perfect lining for each fabric-lined bag...

                                                                                ...is a special joy for me. :)

                                               Because I didn't 'think ahead' about a pocket for this one...

                                      ...I ended up hand-stitching a green felt pocket to the fabric lining...

                                                                             ...for extra functionality!


Thursday, July 26, 2012

Felter's Fling 2011 "Love Blanket" WIP- Part 2 of 2

Rolling up the wetted-out project in thin plastic...

 
...tying it with strips cut from the legs of old pantyhose...

...and rolling it all up in a towel...

 
...then popping it into the top of the pantyhose and tying it closed...

...prior to putting it into the tumble dryer.

 
The felt heart was a gift from Liz Clay to each of the students in our garment class...

...and the multi-colored 'cross section' decorating the middle...

...was a leftover bit from my good friend Dawn Edwards.

 
I love the shiny texture and brilliant color of the tussah silk...

...and the grid-like design of the finished felt.

 
My first two (smaller) pieces.

 
Each re-purposed 'spot' has something unique about it...

...and I remember the garments made from every bit of fabric of fiber...

...much as an 'old time quilter' remembers the origin of each pieced-together square. :)

 
The larger (dryer felt) piece with her two smaller sisters.

 
Although I cannot yet claim to have finished this WIP...

...it is one step closer to completion.

I plan to make one more large piece in the dryer...

...and then stitch them all together into the blanket that I envision.

I find it interesting that the layout alone made the grid-like design...

...with black showing through the natural gaps in the layout of my single layer of white wool.

Sandwiching silk between very thin layers of wool makes for a soft and pliable felt...

...and I can just imagine draping it across my legs as I read in bed, once the cooler weather returns.

Posted by Picasa

Tuesday, July 24, 2012

Felter's Fling 2011 "Love Blanket" WIP- Part 1 of 2

Discarded scraps of fabric, felt and wool from my classmates at 'Fling 2011'.

 
Laying blobs of dyed tussah silk onto thin 'painter's plastic'...

 
...then adding snippets of leftover fabric, felt and fiber.

 
A thin layer of white merino comes next...

 
...followed by a layer of silk gauze...

 
...and two thin layers of black merino.


Wetting the project with water and soaping it up, prior to rolling.

 
This project is a very long-term WIP (work-in-progress)...

...that I started a year ago at Felter's Fling.

Midway through our week-long workshop with Liz Clay...

...I asked my fellow classmates for any small bits of fabric, felt or fiber left over from their garment-making...

...that they were going to otherwise discard.

I thought it would be nice to find new life for cast-off snippets of fiber...

...and, in the end, to surround myself (literally) with the warmth of my fellow feltmakers.

Layering red tussah silk, bits of my friends' work, silk gauze and layers of wool...

...I created a piece of nuno felt that I intended to replicate several times, once home...

...and stitch together into a large blanket for my bed.

I did manage to make one additional small piece...

...but after that, my enthusiasm waned and the project was shelved.

Learning the dryer felt method of making nuno felt in Portugal, however...

...gave me a new, faster way to approach this project...

...and I set about to make additional panels, so that I might complete the blanket before it gets cold again.

Posted by Picasa

Tuesday, December 14, 2010

WIP Paralysis Overcome! Cropped Top

The nuno felt rectangle...folded in half and sewn, with opening.


The backfield in motion (obscure 60's soul song by Mel and Tim).


Uncovered silk ruffle.


My lovely dancing queen daughter (thanks, L!).


Quite some time ago, I made a piece of nuno felt (here)...

...which I intended to fashion into a skirt (somehow!).

I asked for (and got) advice from fellow felters, I hemmed and hawed...

...but, in the end, I couldn't ever really figure out a way to do it.

Inspiration struck recently in the form of Nicola Brown (Clasheen)...

...who shared with me an easy method for making a cropped top or poncho.

Fold a large, rectangular piece of felt in half, lengthwise...

...then, sewing from the open edge, sew a seam along one side...

...leaving a gap large enough for your head.

By choosing to hem the side which had raw silk still exposed...

...I provided a built-in ruffle for the front of the top!

With a mere 40 seconds of sewing...

...I'd transformed a moldering WIP into a beautiful, wearable garment!

Simply fabulous!!


Posted by Picasa

Wednesday, March 24, 2010

Soothing Stew and a Sneak Peak!


Today is sunny and lovely, again...

...but we've had a grey and rainy week here, overall...

...the kind of weather which requires this soup.

If it's not cold and grey where you are today...

...put this recipe away for when it is.

I guarantee that this will soothe tummies and souls!

Yummy Lentil Barley Stew

1/4 c butter or olive oil
1 & 1/2 cups chopped celery
1 & 1/2 cups chopped onion (I use mild, sweet onions)
3 cloves minced garlic or to taste(I use more!)

Saute the above ingredients in a large sauce pan or dutch oven until the celery, garlic and onions are tender and translucent.

Then add:

2 tsp salt
1 tsp freshly ground pepper (or to taste)
1-2 tsp ground rosemary leaves

1 & 1/2 c pearl barley
1 & 1/2 c dried lentils (the greenish brown ones)
6 finely grated carrots
28-ounce can of crushed tomatoes
6 cups of water

Heat soup until boiling, then reduce the temperature and simmer.
Cook until thickened, stirring occasionally (45 to 60 minutes).

The measurements are just a 'jumping off place', really...

...since you can add more of any ingredient (or more water)...

...in order to achieve the taste and consistency you crave.

It thickens upon standing...

...so don't be surprised if you need to add a little water on day two.
**********************************************************************
As regards my project..."What could it be?"

Materials: pre-felt pieces, wool yarn, netting from vegetable bags...

...synthetic fabric with jewels, vintage lace.

Next time..."What it is." Grin.

Posted by Picasa

Wednesday, February 10, 2010

Stalled WIP-Felted Winter Gloves


A month ago, with the help and encouragement of my wonderful friend Kim, I began my first pair of gloves.

I had been wanting to use the acid-green mohair that came from these adorable angora goats for some time now.

I just love this wild color!!

As Kim advised, if you try these, remember to make a bump at the 'wrist' of your resist...

...whew...what a tongue twister!...

...or else you will never get them on after felting.

She also suggested...

...(after my failure, when I wrote to her, asking for suggestions)...

...wrapping the other fingers in plastic as you work on each one...

...something that had eluded me as I struggled to keep the gloves from turning into mittens! Grin.

My biggest difficulty, however, was that I had made the fatal felting foible of not making a sample first!

So, yes, I was lazy and I got what I got...

...which is a pair of gloves that look adorable...

...but which never fully felted and are still 'hairy and slippery', inside and out.

***************************************************************************
The fix, Kim advises, is to cover them with a fine layer of wool that I know felts well...

...but because I found this project rather difficult and trying...

...the idea of wrapping each finger again is not 'sending me anywhere'.

So here they sit...

...for now.


Posted by Picasa