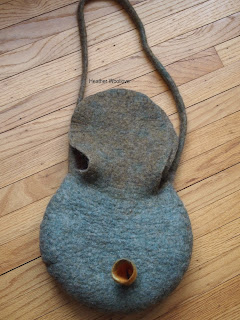
The finished purse front.
With the flaps closed.
The purse back with paisley.
The finished purse with embroidery and beading.
Well, I can't claim that my stitched prefelt experiment was a resounding success...
...since the hundreds of small hand stitches nearly disappeared during the felting process. Sighhhh.
I actually think it would have made more of an impact...
...had I made fewer large stitches, instead!
Since I was already in a hand-stitching mood with this piece...
...I added beads and embroidery to the bag front.
I wanted to echo the large prefelt paisley on the back...
...with a smaller one on the front...
...and also to carry a bit more orange to the flap of the bag! :)


14 comments:
Love how the bag turned out and the fact that you were able to experiment with the stitching. The best part...sneaking more orange into the project.
it's something to wright down in your diary: don't make many small, but some big stitches in prefelt:)
Nicely done Heather! Love the texture of the wool. What is it?
I found that stitching on prefelt is better with 2 layers and a thin yarn.
Love the colors. The closure is really neat too. I wonder if you would have used thicker embroidery stitches if it would have shown up?
Andrea--Yes! Always more orange!:)
Riet--Yes...I'm keeping notes! :)
Joei-Thanks for the tips (for my next experiment!) I used wool roving from Bartlett Yarns that I made into batts with my drum carder.
Kelly--Thanks for another good tip. I think I'll need to play with this technique a bit until I figure it all out!
I like the whole bag!!! But I'm curious for the closure tube. How did you do attach it and how did you roll it, doesn't it get flat? I'm really confused. Please give me a hint! Thanx Hugzz..Peebee
The bag is in one word, gorgious!!! But I'm wondering how you make the closure tube. How did you attach it and how did you roll it, did it not go flat? I'm very confused!! Can you please give me a little explanation! Thanx...hugzz...Peebee
Peebee--If you look closely at Part 1, you'll see the prefelt after I needle-felted it into a tube shape. After that, you flare the base end out and attach it to the bag (there's a photo of this, too in Part 1). Stuff it with a small bit of bubble wrap to keep its shape, and flop it over-first in one direction, then another-while you roll the bag. As long as you've attached it well, it will stay attached and felt along with the rest of the purse. (I've done other tube closures in the past...if you do a search of 'tube closure' in my blog, you'll find other photos that may help you!) XXO-
such a pretty and well made bag!
Thanks, Monika!! Your new tops have been gorgeous, lately, too!! XXO--
Beautiful bag- it looks like just the right size! I love your closure and the way the main colors migrated...lovely!
Thanks, Fiona! I think those tube closures are fun, too.
Good morning buddy,
This bag is fantastic...You know who will love it!!!! Sorry about all of that stitching disappearing...I'm going to examine it closely when opened to see if I can still see them...Have my super-duper strength reading glasses...If there are stitches...I shall find them...Not to worry!!!!
Big hugs,
Dawn
Dawn--I hope she likes it! Yes...tell me what you think of all of those tiny stitches! XXO-
Post a Comment