After wrapping each resist with layers of wool roving...
...and felting for a time...

...I cut a slit into the 'top' of each slipper...

...and turned it 'right side' out.

Using the finished slippers as templates, I cut out leather soles...
...then punched stitching holes around the perimeter of each one...
...prior to attaching them to the felt with nylon thread.

The finished slipper
tops...

...and
bottoms (
suede side 'out').

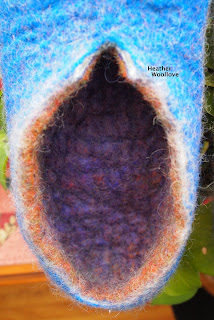
A view of one
pebbly interior.
By utilizing pre-felt in this way...
...it was easy to create a pair of matching slippers!

My neighbor (and walking buddy) has a big birthday coming up...
...and a
foot pampering pair of slippers seemed to be 'just the ticket'!
I made them 'inside out' (as usual)...
...and took pains to keep track of
which side was
which...
...every time I added a new layer of roving.
To prevent them from quickly wearing through...
...(in case he pulls them on to go outside for the newspaper)...
...I added full leather soles.
'Fingers crossed' that they'll fit him when he finally tries them on! :)


