Showing posts with label wrap bag. Show all posts

Saturday, March 29, 2014

Multiple Resist 'Wrap Tie' Bag Experiment- Part 2 of 2

                                                              The fully felted bag...


                                              ...has an exterior pocket that's just the right size...


...for a tin of mints or fennel candies! :)


                                                   A large button was added to the bag front...

                                                            ...to anchor the thin, tie cord...


                               ...and the bag flap covers the opening to the large pocket...

                                                                     ...for security.                                                                   


Thursday, March 27, 2014

Multiple Resist 'Wrap Tie' Bag Experiment- Part 1 of 2

                                                           Laying out wool roving...


                                                                 ...over multiple resists...


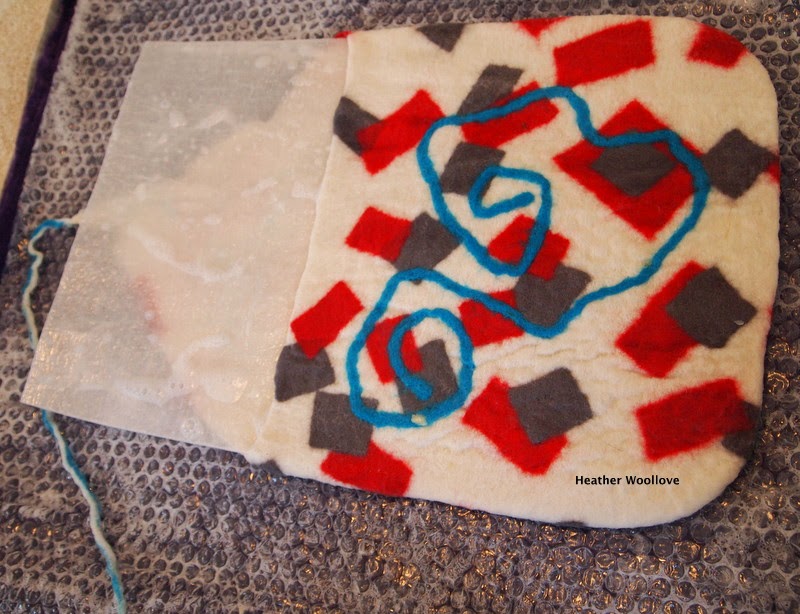
                                            ...and adding pieces of pre-felt and pencil roving...


                                                                ...for embellishment.


                                                    Repeating the process on side two...


...with more pre-felt rectangles and pencil roving squiggles.


                                                               Mid-way through felting.
                                      
                                                     
                                       The fully felted bag (here, displaying its front pocket detail).


                                          While felting friends were here for a mini retreat, recently...

                                           ...we decided to experiment a bit with multiple resists.

                                            This bag has two different kinds of integrated pockets...

                                  ...one made by slitting the bag exterior at the top of an additional resist...

                                       ...and the other, made by tucking in an exterior felt 'extension'.                                     

                                                    Next time: more photos of the finished bag.

Wednesday, May 15, 2013

Union Jack 'Wrap Tie' Bag- Part 2 of 2

Making a long, twisted cord using thin lengths of roving...

 
...then attaching it to the bag flap.

 
Mid-way through felting (the project is still inside-out)...

 
...and, here, after turning the project 'right-side' out.

 
The finished bag (side one)...

 
...and side two...

 
...and shown here with the others in the series (side one)...

 
...and side two.

 
I don't know whether this finished project 'reads' as a 60's inspired bag or not...

...but it was fun to create...

...and I was happy that the strips of silk felted in so easily.

I'm also not sure whether the 'cloud' of blue tussah silk (behind the flower)...

...actually adds to the project or not...

...since it reminds me a little of a space nebula! ;)

Next time: the final wrap bag in this series...

...and (I have to admit) my favorite!

Posted by Picasa

Monday, May 13, 2013

Union Jack 'Wrap-Tie' Bag- Part 1 of 2

Laying out a flower using thin sections of merino roving...

 
...and adding a cloud of dyed blue tussah silk for background shimmer.

 
Covering the flower with a layer of blue roving...

 
...then flipping to side two...

...and adding strips of dyed silk to the surface of the resist.

 
Bright red merino roving goes on next...


...and then a bit more blue.
 
Finishing up the 'flap side' of the resist in glorious red.

 
Wetting out the project, prior to adding the cord.

 
I was going for a 60's, Twiggy, Flower Power kind of bag with this one...

...so I dug through my stash for bright red and blue roving and silk.

Working 'inside-out' as usual...

...I placed embellishments on the foam resist and covered them with layers of roving.

Next time: the finished bag.

Posted by Picasa

Tuesday, May 7, 2013

Green 'Wrap Tie' Bag- Part 3 of 3

Adding a final layer of roving to the 'non design' side...


...and wetting out the project.
 
Mid-way through felting.

 
The finished bag (back side)...

 
...and front.

 
A close-up of the design...

 
...and of the braided cord.

 
With blue button fastener...

...and shown with her orange 'sister'! :)


I finished this envelope as I did my orange one...

...by hand-stitching the bit of extra felt down on the 'non flap' side...

...to provide additional support for the button closure.

Next time: we'll take a break from bags...

...and I'll share photos from this year's Maryland Sheep and Wool Festival!

Posted by Picasa

Sunday, May 5, 2013

Green 'Wrap Tie' Bag- Part 2 of 3

The braided cord, prior to felting.

(I used a plastic container filled with water as a 'third hand' during braiding.)

 
An additional layer of roving on side one...

 
...a flip to side two...

 
...and an additional layer of roving on this side, as well.

 
With both of my recent 'wrap tie' bags...

 
...I worked with an open resist...

 
...and shaped the flap of the bag by hand during the layout.

 
Opening up the dry end of the partially felted cord...

...and attaching it to the body of the bag.

 
Working with open resists is rather a new technique for me...

...and I'm finding that I like it very much.

Rather than cutting the partially felted piece in order to remove the resist...

...and then having to seal the cut edges...

...these edges form on their own with very little effort on my part!

Next time: the finished bag.

Posted by Picasa

Friday, May 3, 2013

Green 'Wrap Tie' Bag- Part 1 of 3

Merino roving...

 
...pulled into short, thin sections...

 
...and laid out on the surface of the resist...

 
...for embellishment.

 
Covering the colored tufts of wool with a layer of white...

 
...and filling in, all around, with aqua and green roving.

 
Sectioning roving into long narrow strips...

 
...and braiding them together to form a long cord.

 
Working inside-out (again)...

...I laid short, narrow tufts of merino roving...

...onto the surface of my resist.

Covering the design with white roving...

...(to form a background)...

...I continued to lay out the rest of the bag in various shades of green.

Instead of a rolled cord for a tie, like in my previous project...

...I made this one from carefully braided sections of roving.

Posted by Picasa